Canon PIXMA SELPHY DS700 DS700 Photo Print Guide - Page 64
Resetting the Ink Counter
 |
View all Canon PIXMA SELPHY DS700 manuals
Add to My Manuals
Save this manual to your list of manuals |
Page 64 highlights
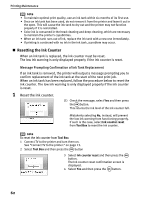
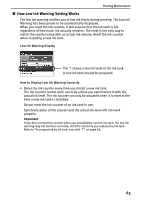
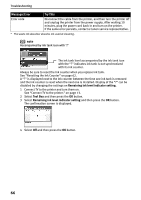
Printing Maintenance note • To maintain optimal print quality, use an ink tank within six months of its first use. • Once an ink tank has been used, do not remove it from the printer and leave it out in the open. This will cause the ink tank to dry out and the printer may not function properly if it is reinstalled. • Color ink is consumed in the head cleaning and deep cleaning, which are necessary to maintain the printer's capabilities. • When an ink tank runs out of ink, replace the ink tank with a new one immediately. • If printing is continued with no ink in the ink tank, a problem may occur. „ Resetting the Ink Counter When an ink tank is replaced, the ink counter must be reset. The low ink warning is only displayed properly if the ink counter is reset. Message Prompting Confirmation of Ink Tank Replacement If an ink tank is removed, the printer will output a message prompting you to confirm replacement of the ink tank at the start of the next print job. When an ink tank has been replaced, follow the procedure below to reset the ink counter. The low ink warning is only displayed properly if the ink counter is reset. 1 Reset the ink counter. (1) Check the message, select Yes and then press the button. This returns the ink level of the ink counter full. Mistakenly selecting No, instead, will prevent the low ink warning from functioning properly. If such is the case, select Ink counter reset from Tool Box to reset the ink counter. note To reset the ink counter from Tool Box 1 Connect TV to the printer and turn them on. See "Connect TV to the printer." on page 13. 2 Select Tool Box and then press the button 3 Select Ink counter reset and then press the button. The Ink counter reset confirmation screen is displayed. 4 Select Yes and then press the button. 62
-
 1
1 -
2
-
3
-
4
-
5
-
6
-
7
-
8
-
9
-
10
-
11
-
12
-
13
-
14
-
15
-
16
-
17
-
18
-
19
-
20
-
21
-
22
-
23
-
24
-
25
-
26
-
27
-
28
-
29
-
30
-
31
-
32
-
33
-
34
-
35
-
36
-
37
-
38
-
39
-
40
-
41
-
42
-
43
-
44
-
45
-
46
-
47
-
48
-
49
-
50
-
51
-
52
-
53
-
54
-
55
-
56
-
57
-
58
-
 59
59 -
 60
60 -
 61
61 -
 62
62 -
 63
63 -
 64
64 -
 65
65 -
 66
66 -
 67
67 -
 68
68 -
 69
69 -
70
-
71
-
72
-
73
-
74
-
75
-
76
-
77
-
78
-
79
-
80
-
81
-
82
-
83
-
84
-
85
-
86
-
87
 |
 |
