Canon PIXMA SELPHY DS700 DS700 Photo Print Guide - Page 62
Replacing an Ink Tank
 |
View all Canon PIXMA SELPHY DS700 manuals
Add to My Manuals
Save this manual to your list of manuals |
Page 62 highlights
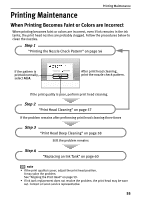
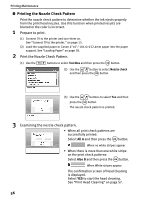
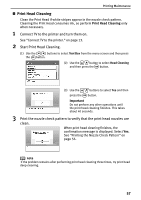
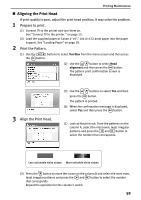
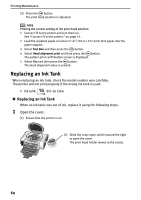
Printing Maintenance (3) Press the button. The print head position is adjusted. note Printing the current setting of the print head position 1 Connect TV to the printer and turn them on. See "Connect TV to the printer." on page 13. 2 Load the supplied paper or Canon 4"×6"/101.6 x 152.4mm Size paper into the paper support. 3 Select Tool Box and then press the button. 4 Select Head alignment print and then press the button. The pattern print confirmation screen is displayed. 5 Select Yes and then press the button. The Head alignment value is printed. Replacing an Ink Tank When replacing an ink tank, check the model number very carefully. The printer will not print properly if the wrong ink tank is used. • Ink tank: BCI-16 Color „ Replacing an Ink Tank When an ink tank runs out of ink, replace it using the following steps. 1 Open the cover. (1) Ensure that the printer is on. (2) Slide the cover open switch toward the right to open the cover. The print head holder moves to the center. 60
-
 1
1 -
2
-
3
-
4
-
5
-
6
-
7
-
8
-
9
-
10
-
11
-
12
-
13
-
14
-
15
-
16
-
17
-
18
-
19
-
20
-
21
-
22
-
23
-
24
-
25
-
26
-
27
-
28
-
29
-
30
-
31
-
32
-
33
-
34
-
35
-
36
-
37
-
38
-
39
-
40
-
41
-
42
-
43
-
44
-
45
-
46
-
47
-
48
-
49
-
50
-
51
-
52
-
53
-
54
-
55
-
56
-
 57
57 -
 58
58 -
 59
59 -
 60
60 -
 61
61 -
 62
62 -
 63
63 -
 64
64 -
 65
65 -
 66
66 -
 67
67 -
68
-
69
-
70
-
71
-
72
-
73
-
74
-
75
-
76
-
77
-
78
-
79
-
80
-
81
-
82
-
83
-
84
-
85
-
86
-
87
 |
 |
