Canon PowerShot SD890 IS Software Guide for Windows - Page 22
More Advanced Techniques, Editing Images, Red Eye Correction, Auto Adjustment
 |
View all Canon PowerShot SD890 IS manuals
Add to My Manuals
Save this manual to your list of manuals |
Page 22 highlights
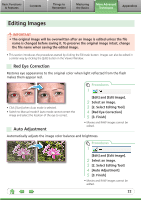
Basic Functions & Features Contents Things to Remember Mastering the Basics More Advanced Techniques Appendices Editing Images IMPORTANT • The original image will be overwritten after an image is edited unless the file name is changed before saving it. To preserve the original image intact, change the file name when saving the edited image. • This section introduces the procedures started by clicking the Edit task button. Images can also be edited in a similar way by clicking the [Edit] button in the Viewer Window. Red Eye Correction Restores eye appearance to the original color when light reflected from the flash makes them appear red. Procedures 1 • Click [Start] when Auto mode is selected. • Switch to Manual mode if Auto mode cannot correct the image and select the location of the eye to correct. Auto Adjustment [Edit] and [Edit Image]. 2 Select an image. 3 [2. Select Editing Tool] 4 [Red Eye Correction] 5 [3. Finish] • Movies and RAW images cannot be edited. Automatically adjusts the image color balance and brightness. Procedures 1 [Edit] and [Edit Image]. 2 Select an image. 3 [2. Select Editing Tool] 4 [Auto Adjustment] 5 [3. Finish] • Movies and RAW images cannot be edited. 22
-
 1
1 -
2
-
3
-
4
-
5
-
6
-
7
-
8
-
9
-
10
-
11
-
12
-
13
-
14
-
15
-
16
-
 17
17 -
 18
18 -
 19
19 -
 20
20 -
 21
21 -
 22
22 -
 23
23 -
 24
24 -
 25
25 -
 26
26 -
 27
27 -
28
-
29
-
30
-
31
-
32
-
33
-
34
-
35
-
36
-
37
-
38
-
39
-
40
-
41
-
42
-
43
-
44
-
45
-
46
-
47
-
48
-
49
 |
 |
