Canon PowerShot SX280 HS User Guide - Page 18
Trying the Camera Out - specifications
 |
View all Canon PowerShot SX280 HS manuals
Add to My Manuals
Save this manual to your list of manuals |
Page 18 highlights
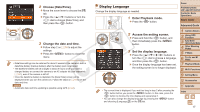
Still Images Trying the Camera Out Movies Follow these instructions to turn the camera on, shoot still images or movies, and then view them. Shooting (Smart Auto) For fully automatic selection of the optimal settings for specific scenes, simply let the camera determine the subject and shooting conditions. 1 Turn the camera on. zzPress the power button. XXThe startup screen is displayed. 2 Enter [ ] mode. zzSet the mode dial to [ ]. zzAim the camera at the subject. The camera will make a slight clicking noise as it determines the scene. XXIcons representing the scene and image stabilization mode are displayed in the upper left of the screen. XXFrames displayed around any detected subjects indicate that they are in focus. 3 Compose the shot. zzTo zoom in and enlarge the subject, move the zoom lever toward (telephoto), and to zoom away from the subject, move it toward (wide angle). 4 Shoot. Shooting Still Images Focus. zzPress the shutter button lightly, halfway down. The camera beeps twice after focusing, and AF frames are displayed to indicate image areas in focus. XXThe flash automatically rises in low-light conditions. Shoot. zzPress the shutter button all the way down. XXAs the camera shoots, a shutter sound is played, and in low-light conditions when the flash is up, it fires automatically. zzKeep the camera still until the shutter sound ends. XXYour shot is only displayed until the camera is ready to shoot again. Cover Preliminary Notes and Legal Information Contents: Basic Operations Basic Guide Advanced Guide 1 Camera Basics 2 Using GPS Function 3 Auto Mode/ Hybrid Auto Mode 4 Other Shooting Modes 5 P Mode 6 Tv, Av, and M Mode 7 Playback Mode 8 Wi-Fi Functions 9 Setting Menu 10 Accessories 11 Appendix Index 18
-
 1
1 -
2
-
3
-
4
-
5
-
6
-
7
-
8
-
9
-
10
-
11
-
12
-
 13
13 -
 14
14 -
 15
15 -
 16
16 -
 17
17 -
 18
18 -
 19
19 -
 20
20 -
 21
21 -
 22
22 -
 23
23 -
24
-
25
-
26
-
27
-
28
-
29
-
30
-
31
-
32
-
33
-
34
-
35
-
36
-
37
-
38
-
39
-
40
-
41
-
42
-
43
-
44
-
45
-
46
-
47
-
48
-
49
-
50
-
51
-
52
-
53
-
54
-
55
-
56
-
57
-
58
-
59
-
60
-
61
-
62
-
63
-
64
-
65
-
66
-
67
-
68
-
69
-
70
-
71
-
72
-
73
-
74
-
75
-
76
-
77
-
78
-
79
-
80
-
81
-
82
-
83
-
84
-
85
-
86
-
87
-
88
-
89
-
90
-
91
-
92
-
93
-
94
-
95
-
96
-
97
-
98
-
99
-
100
-
101
-
102
-
103
-
104
-
105
-
106
-
107
-
108
-
109
-
110
-
111
-
112
-
113
-
114
-
115
-
116
-
117
-
118
-
119
-
120
-
121
-
122
-
123
-
124
-
125
-
126
-
127
-
128
-
129
-
130
-
131
-
132
-
133
-
134
-
135
-
136
-
137
-
138
-
139
-
140
-
141
-
142
-
143
-
144
-
145
-
146
-
147
-
148
-
149
-
150
-
151
-
152
-
153
-
154
-
155
-
156
-
157
-
158
-
159
-
160
-
161
-
162
-
163
-
164
-
165
-
166
-
167
-
168
-
169
-
170
-
171
-
172
-
173
-
174
-
175
-
176
-
177
-
178
-
179
-
180
-
181
-
182
-
183
-
184
-
185
-
186
-
187
-
188
-
189
-
190
-
191
-
192
-
193
-
194
-
195
-
196
-
197
-
198
 |
 |
