Canon PowerShot SX280 HS User Guide - Page 58
Xcopy
 |
View all Canon PowerShot SX280 HS manuals
Add to My Manuals
Save this manual to your list of manuals |
Page 58 highlights
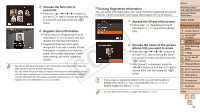
zzPress the buttons or turn the dial to choose [Add to Registry], and then press the button. zzPress the buttons or turn the dial to choose [Add a New Face], and then press the button. 2 Register face information. zzAim the camera so that the face of the person you want to register is inside the gray frame at the center of the screen. zzA white frame on the person's face indicates that the face is recognized. Make sure a white frame is displayed on the face, and then shoot. zzIf the face is not recognized, you cannot register face information. zzAfter [Register?] is displayed, press the buttons or turn the dial to choose [OK], and then press the button. XXThe [Edit Profile] screen is displayed. 3 Register the person's name and birthday. zzPress the button. Cover Preliminary Notes and Legal Information Contents: Basic Operations Basic Guide zzPress the buttons or turn the dial to choose a character, and then press the button to enter it. zzUp to 10 characters can be used. zzChoose [ ] or [ ] and press the button to move the cursor. zzChoose [ ] and press the button. The previous character will be deleted. zzPress the button to return to the [Edit Profile] screen. zzTo register a birthday, on the [Edit Profile] screen, choose [Birthday] (either press the buttons or turn the dial), and then press the button. zzPress the buttons to choose a setting. zzPress the buttons or turn the dial to specify the date. zzWhen finished, press the button. Advanced Guide 1 Camera Basics 2 Using GPS Function 3 Auto Mode/ Hybrid Auto Mode 4 Other Shooting Modes 5 P Mode 6 Tv, Av, and M Mode 7 Playback Mode 8 Wi-Fi Functions 9 Setting Menu 10 Accessories 11 Appendix Index 58
-
 1
1 -
2
-
3
-
4
-
5
-
6
-
7
-
8
-
9
-
10
-
11
-
12
-
13
-
14
-
15
-
16
-
17
-
18
-
19
-
20
-
21
-
22
-
23
-
24
-
25
-
26
-
27
-
28
-
29
-
30
-
31
-
32
-
33
-
34
-
35
-
36
-
37
-
38
-
39
-
40
-
41
-
42
-
43
-
44
-
45
-
46
-
47
-
48
-
49
-
50
-
51
-
52
-
 53
53 -
 54
54 -
 55
55 -
 56
56 -
 57
57 -
 58
58 -
 59
59 -
 60
60 -
 61
61 -
 62
62 -
 63
63 -
64
-
65
-
66
-
67
-
68
-
69
-
70
-
71
-
72
-
73
-
74
-
75
-
76
-
77
-
78
-
79
-
80
-
81
-
82
-
83
-
84
-
85
-
86
-
87
-
88
-
89
-
90
-
91
-
92
-
93
-
94
-
95
-
96
-
97
-
98
-
99
-
100
-
101
-
102
-
103
-
104
-
105
-
106
-
107
-
108
-
109
-
110
-
111
-
112
-
113
-
114
-
115
-
116
-
117
-
118
-
119
-
120
-
121
-
122
-
123
-
124
-
125
-
126
-
127
-
128
-
129
-
130
-
131
-
132
-
133
-
134
-
135
-
136
-
137
-
138
-
139
-
140
-
141
-
142
-
143
-
144
-
145
-
146
-
147
-
148
-
149
-
150
-
151
-
152
-
153
-
154
-
155
-
156
-
157
-
158
-
159
-
160
-
161
-
162
-
163
-
164
-
165
-
166
-
167
-
168
-
169
-
170
-
171
-
172
-
173
-
174
-
175
-
176
-
177
-
178
-
179
-
180
-
181
-
182
-
183
-
184
-
185
-
186
-
187
-
188
-
189
-
190
-
191
-
192
-
193
-
194
-
195
-
196
-
197
-
198
 |
 |
