Canon S820 Photo Application Guide(Windows) - Page 147
Clipping, Photo Viewer, CLOSE, Artwork/Layout album, Fixed photo size printing
 |
View all Canon S820 manuals
Add to My Manuals
Save this manual to your list of manuals |
Page 147 highlights
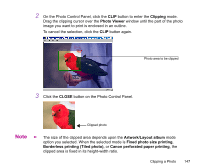
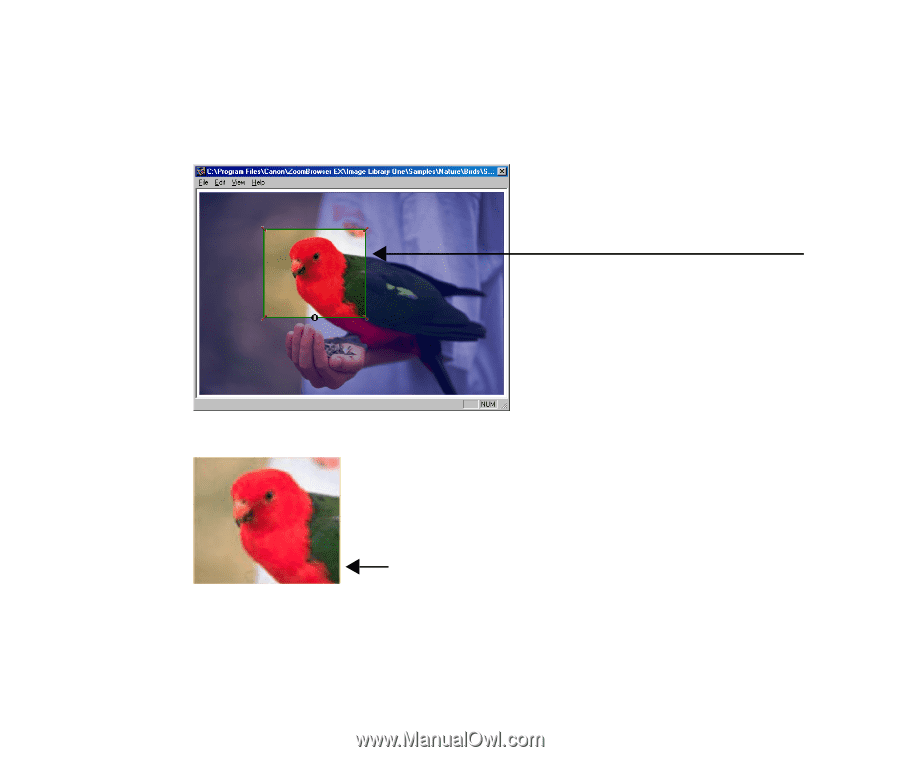
2 On the Photo Control Panel, click the CLIP button to enter the Clipping mode. Drag the clipping cursor over the Photo Viewer window until the part of the photo image you want to print is enclosed in an outline. To cancel the selection, click the CLIP button again. Photo area to be clipped 3 Click the CLOSE button on the Photo Control Panel. Clipped photo Note ³ The size of the clipped area depends upon the Artwork/Layout album mode option you selected. When the selected mode is Fixed photo size printing, Borderless printing (Tiled photo), or Canon perforated paper printing, the clipped area is fixed in its height-width ratio. Clipping a Photo 147
-
 1
1 -
2
-
3
-
4
-
5
-
6
-
7
-
8
-
9
-
10
-
11
-
12
-
13
-
14
-
15
-
16
-
17
-
18
-
19
-
20
-
21
-
22
-
23
-
24
-
25
-
26
-
27
-
28
-
29
-
30
-
31
-
32
-
33
-
34
-
35
-
36
-
37
-
38
-
39
-
40
-
41
-
42
-
43
-
44
-
45
-
46
-
47
-
48
-
49
-
50
-
51
-
52
-
53
-
54
-
55
-
56
-
57
-
58
-
59
-
60
-
61
-
62
-
63
-
64
-
65
-
66
-
67
-
68
-
69
-
70
-
71
-
72
-
73
-
74
-
75
-
76
-
77
-
78
-
79
-
80
-
81
-
82
-
83
-
84
-
85
-
86
-
87
-
88
-
89
-
90
-
91
-
92
-
93
-
94
-
95
-
96
-
97
-
98
-
99
-
100
-
101
-
102
-
103
-
104
-
105
-
106
-
107
-
108
-
109
-
110
-
111
-
112
-
113
-
114
-
115
-
116
-
117
-
118
-
119
-
120
-
121
-
122
-
123
-
124
-
125
-
126
-
127
-
128
-
129
-
130
-
131
-
132
-
133
-
134
-
135
-
136
-
137
-
138
-
139
-
140
-
141
-
 142
142 -
 143
143 -
 144
144 -
 145
145 -
 146
146 -
 147
147 -
 148
148 -
 149
149 -
 150
150 -
 151
151 -
 152
152 -
153
-
154
-
155
-
156
-
157
-
158
 |
 |
Clipping a Photo
147
2
On the Photo Control Panel, click the
CLIP
button to enter the
Clipping
mode.
Drag the clipping cursor over the
Photo Viewer
window until the part of the photo
image you want to print is enclosed in an outline.
To cancel the selection, click the
CLIP
button again.
3
Click the
CLOSE
button on the Photo Control Panel.
Note
³
The size of the clipped area depends upon the
Artwork/Layout album
mode
option you selected. When the selected mode is
Fixed photo size printing
,
Borderless printing (Tiled photo),
or
Canon perforated paper printing
, the
clipped area is fixed in its height-width ratio.
Photo area to be clipped
Clipped photo