Canon VIXIA HF M500 VIXIA HF M50 / HF M52 / HF M500 Instruction Manual - Page 159
Connecting to the Computer and Uploading your Videos - hd camcorder
 |
View all Canon VIXIA HF M500 manuals
Add to My Manuals
Save this manual to your list of manuals |
Page 159 highlights
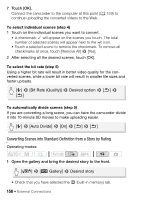
2 Select the rating of the stories you want to convert. [Story Details] > [Select by Rating] > Desired rating > [K] 3 Touch [Edit Story] > [Convert HD'SD (%)] and continue the conversion to standard definition from step 5 in the previous procedure (A 157). NOTES • When converting scenes from a story: - All the scenes are merged into one converted SD movie. - If the converted SD movie is too large, it will be split into smaller 10-minute long movies. - The maximum total playback time of the scenes to be converted is 12 hours. Connecting to the Computer and Uploading your Videos Operating modes: 1 Connect the camcorder to the computer using the supplied USB cable. Connection #-1. Refer to Connection Diagrams (A 140). 2 Select [All (for PC only)]. 3 VideoBrowser will start up automatically. Click the YouTube icon in the menu panel and follow the software's instructions to upload your SD movies to the Web. For details about using the software, click to open the Software Guide (PDF file). External Connections Š 159
-
 1
1 -
2
-
3
-
4
-
5
-
6
-
7
-
8
-
9
-
10
-
11
-
12
-
13
-
14
-
15
-
16
-
17
-
18
-
19
-
20
-
21
-
22
-
23
-
24
-
25
-
26
-
27
-
28
-
29
-
30
-
31
-
32
-
33
-
34
-
35
-
36
-
37
-
38
-
39
-
40
-
41
-
42
-
43
-
44
-
45
-
46
-
47
-
48
-
49
-
50
-
51
-
52
-
53
-
54
-
55
-
56
-
57
-
58
-
59
-
60
-
61
-
62
-
63
-
64
-
65
-
66
-
67
-
68
-
69
-
70
-
71
-
72
-
73
-
74
-
75
-
76
-
77
-
78
-
79
-
80
-
81
-
82
-
83
-
84
-
85
-
86
-
87
-
88
-
89
-
90
-
91
-
92
-
93
-
94
-
95
-
96
-
97
-
98
-
99
-
100
-
101
-
102
-
103
-
104
-
105
-
106
-
107
-
108
-
109
-
110
-
111
-
112
-
113
-
114
-
115
-
116
-
117
-
118
-
119
-
120
-
121
-
122
-
123
-
124
-
125
-
126
-
127
-
128
-
129
-
130
-
131
-
132
-
133
-
134
-
135
-
136
-
137
-
138
-
139
-
140
-
141
-
142
-
143
-
144
-
145
-
146
-
147
-
148
-
149
-
150
-
151
-
152
-
153
-
 154
154 -
 155
155 -
 156
156 -
 157
157 -
 158
158 -
 159
159 -
 160
160 -
 161
161 -
 162
162 -
 163
163 -
 164
164 -
165
-
166
-
167
-
168
-
169
-
170
-
171
-
172
-
173
-
174
-
175
-
176
-
177
-
178
-
179
-
180
-
181
-
182
-
183
-
184
-
185
-
186
-
187
-
188
-
189
-
190
-
191
-
192
-
193
-
194
-
195
-
196
-
197
-
198
-
199
-
200
-
201
-
202
-
203
-
204
-
205
-
206
-
207
-
208
-
209
-
210
-
211
-
212
-
213
-
214
-
215
-
216
-
217
-
218
-
219
-
220
-
221
-
222
-
223
-
224
-
225
-
226
-
227
-
228
-
229
-
230
-
231
-
232
-
233
-
234
-
235
-
236
-
237
-
238
-
239
-
240
-
241
-
242
-
243
-
244
-
245
-
246
 |
 |
