Canon VIXIA HF M500 VIXIA HF M50 / HF M52 / HF M500 Instruction Manual - Page 160
Uploading your Videos Using an Eye-Fi Card
 |
View all Canon VIXIA HF M500 manuals
Add to My Manuals
Save this manual to your list of manuals |
Page 160 highlights
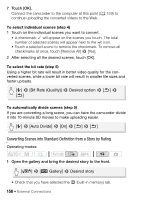
IMPORTANT • While the camcorder is connected to the computer, do not open the memory card slot cover and do not remove the memory cards. • Observe the following precautions while the ACCESS indicator is on or flashing. Failing to do so may result in permanent data loss. - Do not open the memory card slot cover. - Do not disconnect the USB cable. - Do not disconnect the compact power adapter or turn off the camcorder or the computer. NOTES • The time required to convert scenes is approximately equal to the total playback time of the converted scenes. In most cases this is still faster than converting the scenes in the computer so we recommend you convert scenes in the camcorder. • Movies cannot be converted if the file numbering is at maximum (A 192). • You can check and play back the converted SD movies from the [SD Movies] index screen on the memory card. Uploading your Videos Using an Eye-Fi Card If you are using an Eye-Fi card, you can automatically upload movies to your favorite video sharing Web site. You will need to have installed the software supplied with your Eye-Fi card and completed all the required configuration setup in advance. Refer to the instruction manual of the Eye-Fi card. Also, note that not all Eye-Fi cards can upload AVCHD movies. Check compatibility in advance. Please read the IMPORTANT section before using an Eye-Fi card. Operating modes: 1 Insert your Eye-Fi card into the memory card slot and make sure there is sufficient available space on the memory card. 160 Š External Connections
-
 1
1 -
2
-
3
-
4
-
5
-
6
-
7
-
8
-
9
-
10
-
11
-
12
-
13
-
14
-
15
-
16
-
17
-
18
-
19
-
20
-
21
-
22
-
23
-
24
-
25
-
26
-
27
-
28
-
29
-
30
-
31
-
32
-
33
-
34
-
35
-
36
-
37
-
38
-
39
-
40
-
41
-
42
-
43
-
44
-
45
-
46
-
47
-
48
-
49
-
50
-
51
-
52
-
53
-
54
-
55
-
56
-
57
-
58
-
59
-
60
-
61
-
62
-
63
-
64
-
65
-
66
-
67
-
68
-
69
-
70
-
71
-
72
-
73
-
74
-
75
-
76
-
77
-
78
-
79
-
80
-
81
-
82
-
83
-
84
-
85
-
86
-
87
-
88
-
89
-
90
-
91
-
92
-
93
-
94
-
95
-
96
-
97
-
98
-
99
-
100
-
101
-
102
-
103
-
104
-
105
-
106
-
107
-
108
-
109
-
110
-
111
-
112
-
113
-
114
-
115
-
116
-
117
-
118
-
119
-
120
-
121
-
122
-
123
-
124
-
125
-
126
-
127
-
128
-
129
-
130
-
131
-
132
-
133
-
134
-
135
-
136
-
137
-
138
-
139
-
140
-
141
-
142
-
143
-
144
-
145
-
146
-
147
-
148
-
149
-
150
-
151
-
152
-
153
-
154
-
 155
155 -
 156
156 -
 157
157 -
 158
158 -
 159
159 -
 160
160 -
 161
161 -
 162
162 -
 163
163 -
 164
164 -
 165
165 -
166
-
167
-
168
-
169
-
170
-
171
-
172
-
173
-
174
-
175
-
176
-
177
-
178
-
179
-
180
-
181
-
182
-
183
-
184
-
185
-
186
-
187
-
188
-
189
-
190
-
191
-
192
-
193
-
194
-
195
-
196
-
197
-
198
-
199
-
200
-
201
-
202
-
203
-
204
-
205
-
206
-
207
-
208
-
209
-
210
-
211
-
212
-
213
-
214
-
215
-
216
-
217
-
218
-
219
-
220
-
221
-
222
-
223
-
224
-
225
-
226
-
227
-
228
-
229
-
230
-
231
-
232
-
233
-
234
-
235
-
236
-
237
-
238
-
239
-
240
-
241
-
242
-
243
-
244
-
245
-
246
 |
 |
