Canon imagePROGRAF W6400 HDI-E.pdf
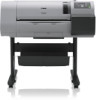
Canon imagePROGRAF W6400 Manual
 |
View all Canon imagePROGRAF W6400 manuals
Add to My Manuals
Save this manual to your list of manuals |
Canon imagePROGRAF W6400 manual content summary:
- Canon imagePROGRAF W6400 | HDI-E.pdf - Page 1
Use This Guide ...ii ■ Conventions...ii ■ Button Notations ...ii ■ Trademarks ...ii ■ A Request to Our Customers ii Chapter 1 HDI Driver Installation 1-1 Operating Environment...1-1 Installation Procedure ...1-1 ■ Installing with the Canon Installer 1-1 ■ Installing with the Add-A-Plotter Wizard - Canon imagePROGRAF W6400 | HDI-E.pdf - Page 2
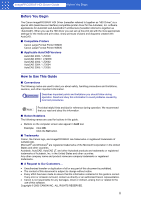
imagePROGRAF HDI Driver Guide Before You Begin Before You Begin The Canon imagePROGRAF HDI Driver (hereafter referred to together as "HDI Driver") is a special HDI (Heidi Device Interface) compatible printer driver for the Autodesk, Inc. software applications for AutoCAD and AutoCAD LT - Canon imagePROGRAF W6400 | HDI-E.pdf - Page 3
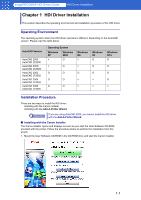
If you are using AutoCAD 2000, you cannot install the HDI driver Important with the Add-A-Plotter Wizard. ■ Installing with the Canon Installer The Canon installer opens and displays as soon as you start the User Software CD-ROM provided with the printer. Follow the procedure below to perform the - Canon imagePROGRAF W6400 | HDI-E.pdf - Page 4
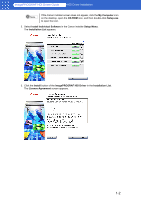
imagePROGRAF HDI Driver Guide HDI Driver Installation Note If the Canon installer screen does not appear, click the My Computer icon on the desktop, open the CD-ROM icon, and then double-click Setup.exe to open the icon. 2. Select Install Individual Software in the Canon installer Setup Menu. - Canon imagePROGRAF W6400 | HDI-E.pdf - Page 5
the Next button. The Install imagePROGRAF HDI Driver screen appears. 5. Select the version number of your AutoCAD and click the Install button. The HDI driver files are copied to the Drv folder where the AutoCAD program files are stored. 6. After AutoCAD starts, select Plotter Manager from the File - Canon imagePROGRAF W6400 | HDI-E.pdf - Page 6
imagePROGRAF HDI Driver Guide HDI Driver Installation 8. Check the displayed screen and then click the Next button. The Add Plotter - Begin screen opens. 9. Select My Computer then click the Next button. The Add Plotter - Plotter Model screen opens. 10.Make sure that Canon, Inc. is selected in - Canon imagePROGRAF W6400 | HDI-E.pdf - Page 7
imagePROGRAF HDI Driver Guide HDI Driver Installation 11. Click the Next button. The Add Plotter - Ports screen opens. 12.Make sure that Plot to a port is selected, select the port that you want to use for the plotter, then click the Next button. The Add Plotter - Plotter Name screen opens. Note - Canon imagePROGRAF W6400 | HDI-E.pdf - Page 8
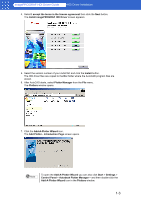
imagePROGRAF HDI Driver Guide HDI Driver Installation ■ Installing with the Add-A-Plotter Wizard Follow the procedure below to use the Add-A-Plotter Wizard to install the HDI driver without the Canon installer. 1. After AutoCAD starts, select Plotter Manager from the File menu. The Plotters window - Canon imagePROGRAF W6400 | HDI-E.pdf - Page 9
imagePROGRAF HDI Driver Guide HDI Driver Installation 4. Select My Computer then click the Next button. The Add Plotter - Plotter Model screen opens. 5. Mount the User Software CD-ROM in the CD-ROM drive. 6. On the Add Plotter - Plotter Model screen, click the Have Disk button. The Open dialog - Canon imagePROGRAF W6400 | HDI-E.pdf - Page 10
imagePROGRAF HDI Driver Guide HDI Driver Installation The Add Plotter - Import Pcp or Pc2 screen opens. Note If you want the installer to read plotter information from previously stored PCP or PC2 files, click the Import File button. If you do not want to read these files, just go to - Canon imagePROGRAF W6400 | HDI-E.pdf - Page 11
imagePROGRAF HDI Driver Guide HDI Driver Installation 12.Click the Next button. The HDI driver files are copied to the Drv folder where the AutoCAD program files are stored, then the Add Plotter - Finish screen opens. 13.Click the Finish button. This completes the installation of the HDI driver. - Canon imagePROGRAF W6400 | HDI-E.pdf - Page 12
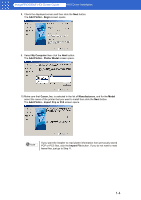
imagePROGRAF HDI Driver Guide Printing Chapter 2 Printing This section describes how to execute a print job with the HDI driver. The description below uses printing with the AutoCAD 2004 as an example. Printing Procedure 1. Start AutoCAD and open the image file. 2. Select Plot from the File menu. - Canon imagePROGRAF W6400 | HDI-E.pdf - Page 13
imagePROGRAF HDI Driver Guide Printing 5. Perform the settings that you need for the print job. Note For more details about how to perform the settings in the Plotter Configuration Editor dialog box, please refer to Chapter 3, "Setting Up a Print Job" (p.3-1). 6. Click the OK button to close - Canon imagePROGRAF W6400 | HDI-E.pdf - Page 14
imagePROGRAF HDI Driver Guide Setting Up a Print Job Chapter 3 Setting Up a Print Job This section describes the HDI driver settings. The HDI driver settings are done in the Plotter Configuration Editor dialog box. Opening the Plotter Configuration Editor Dialog Box You can open the Plotter - Canon imagePROGRAF W6400 | HDI-E.pdf - Page 15
imagePROGRAF HDI Driver Guide Setting Up a Print Job 2. Double-click the Autodesk Plotter Manager icon. The Plotters window opens. 3. Double-click the W6400PG icon (the icon name is the name of the printer you use) to open. The Plotter Configuration Editor dialog box opens. Plotter Configuration - Canon imagePROGRAF W6400 | HDI-E.pdf - Page 16
imagePROGRAF HDI Driver Guide Setting Up a Print Job The procedures for setting each item are described below. Media Source and Media Size Settings Follow this procedure to select the media source (Cut Sheet or Roll Paper) and the media size. 1. Press the Source and Size button below Media. The - Canon imagePROGRAF W6400 | HDI-E.pdf - Page 17
imagePROGRAF HDI Driver Guide Setting Up a Print Job Graphics Settings Use these settings to adjust the print mode and resolution. is required. Print speed is slower due to the higher resolution setting. Achieves the best printing results, but printing time is longer and a large amount of computer - Canon imagePROGRAF W6400 | HDI-E.pdf - Page 18
imagePROGRAF HDI Driver Guide Setting Up a Print Job Opening the Custom Properties Dialog Box In the Note For more details about how to open the Plotter Configuration Editor dialog box, please refer to Chapter 3, "Opening the Plotter Configuration Editor Dialog Box" (p.3-1). 2. Click Custom - Canon imagePROGRAF W6400 | HDI-E.pdf - Page 19
of media that can be selected for printing depends on the ink type specification. • If the black ink selected for Ink Type does not match the ink type of the tank actually loaded in the printer, the printer will issue an alert on the printer operation panel. You must then decide whether to execute - Canon imagePROGRAF W6400 | HDI-E.pdf - Page 20
or cyan lines or other portions of images that are difficult to see when printed in white space can become easier to see. 4. Click the OK button. ■ Media Detailed Settings You can use the printer operation panel to perform suitable settings for ink drying time of each media and other features - Canon imagePROGRAF W6400 | HDI-E.pdf - Page 21
imagePROGRAF HDI Driver Guide Setting Up a Print Job Between Pages presents the following items for selection. Between Pages Printer Default None 30 sec., 1 min., 3 min., 5 min., 10 min., 30 min., 60 min. Setting Details This item resets the value to the printer default settings. Cancels the ink - Canon imagePROGRAF W6400 | HDI-E.pdf - Page 22
imagePROGRAF HDI Driver Guide Setting Up a Print Job 3. Click the OK button. Important If you make the margin (white space) too small, this could disturb the print image or cause the printhead to scour the surface of some types of media. If the printhead scours the surface of the media, adjust - Canon imagePROGRAF W6400 | HDI-E.pdf - Page 23
imagePROGRAF HDI Driver Guide Setting Up a Print Job Cut Speed printer driver. Keep Media Size (a) On (b) Off Setting Details The margins settings are taken from inside the specified media. The external size of the media is preserved and the printing area becomes smaller so part of the image - Canon imagePROGRAF W6400 | HDI-E.pdf - Page 24
imagePROGRAF HDI Driver Guide Index Index A Add Plotter - Begin, 1-4, 1-6 Add Plotter - Finish, 1-5, 1-9 Add Plotter - Import Pcp or Pc2, 1-4, 1-8 Add Plotter - Introduction Page, 1-3, 1-6 Add Plotter - Plotter Model, 1-4, 1-7 Add Plotter - Plotter Name, 1-5, 1-8 Add Plotter - Ports, 1-5, 1-8 Add
-
 1
1 -
 2
2 -
 3
3 -
 4
4 -
 5
5 -
 6
6 -
 7
7 -
8
-
9
-
10
-
11
-
12
-
13
-
14
-
15
-
16
-
17
-
18
-
19
-
20
-
21
-
22
-
23
-
24
 |
 |

i
imagePROGRAF
HDI Driver Guide
Contents
Before You Begin
...................................................................................................................
ii
■
Compatible Printers
.......................................................................................................
ii
■
Applicable AutoCAD Versions
.......................................................................................
ii
How to Use This Guide
..........................................................................................................
ii
■
Conventions
...................................................................................................................
ii
■
Button Notations
............................................................................................................
ii
■
Trademarks
...................................................................................................................
ii
■
A Request to Our Customers…
.....................................................................................
ii
Chapter 1
HDI Driver Installation
............................................................................
1-1
Operating Environment
.......................................................................................................
1-1
Installation Procedure
.........................................................................................................
1-1
■
Installing with the Canon Installer
..............................................................................
1-1
■
Installing with the Add-A-Plotter Wizard
....................................................................
1-6
Chapter 2
Printing
...................................................................................................
2-1
Printing Procedure
..............................................................................................................
2-1
Chapter 3
Setting Up a Print Job
............................................................................
3-1
Opening the Plotter Configuration Editor Dialog Box
..........................................................
3-1
■
Opening from the AutoCAD File Menu
......................................................................
3-1
■
Opening from the Start Menu
....................................................................................
3-1
Plotter Configuration Editor Dialog Box Functions
..............................................................
3-2
■
Device and Document Settings Sheet
.......................................................................
3-2
Opening the Custom Properties Dialog Box
.......................................................................
3-5
Custom Properties Dialog Box Functions
...........................................................................
3-5
■
Selecting the Media Type and Ink Type
....................................................................
3-6
■
Color Matching and Brightness Settings
...................................................................
3-6
■
Media Detailed Settings
.............................................................................................
3-7
Index
...................................................................................................................
Index-1