Canon imagePROGRAF W6400 HDI-E.pdf - Page 7
Add Plotter - Ports, Plot to a port, Add Plotter, Plotter Name, Finish, Installation List, Setup Menu
 |
View all Canon imagePROGRAF W6400 manuals
Add to My Manuals
Save this manual to your list of manuals |
Page 7 highlights
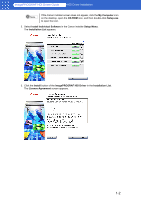
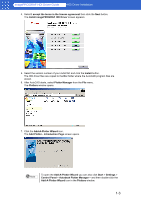
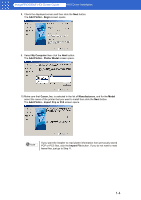
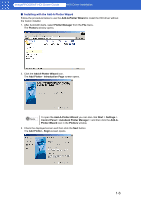
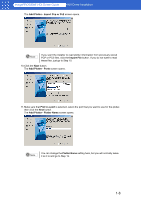
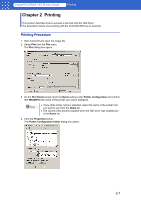
imagePROGRAF HDI Driver Guide HDI Driver Installation 11. Click the Next button. The Add Plotter - Ports screen opens. 12.Make sure that Plot to a port is selected, select the port that you want to use for the plotter, then click the Next button. The Add Plotter - Plotter Name screen opens. Note You can change the Plotter Name setting here, but you will normally leave it as it is and go to Step 13. 13.Click the Next button. The Add Plotter - Finish screen opens. 14.Click the Finish button. This completes the installation of the HDI driver. 15.Clicking the Finish button closes the Installation List and Setup Menu and ejects the User Software CD-ROM from the CD-ROM drive. 1-5
-
 1
1 -
 2
2 -
 3
3 -
 4
4 -
 5
5 -
 6
6 -
 7
7 -
 8
8 -
 9
9 -
 10
10 -
 11
11 -
 12
12 -
13
-
14
-
15
-
16
-
17
-
18
-
19
-
20
-
21
-
22
-
23
-
24
 |
 |

1-5
imagePROGRAF HDI Driver Guide
HDI Driver Installation
11.Click the
Next
button.
The
Add Plotter - Ports
screen opens.
12.Make sure that
Plot to a port
is selected, select the port that you want to use for the plotter,
then click the
Next
button.
The
Add Plotter
-
Plotter Name
screen opens.
13.Click the
Next
button.
The
Add Plotter - Finish
screen opens.
14.Click the
Finish
button.
This completes the installation of the HDI driver.
15.Clicking the
Finish
button closes the
Installation List
and
Setup Menu
and ejects the User
Software CD-ROM from the CD-ROM drive.
You can change the
Plotter Name
setting here, but you will normally leave
it as it is and go to Step 13.
Note