Canon imagePROGRAF iPF650 iPF650 655 750 755 Basic Guide Step3
Canon imagePROGRAF iPF650 Manual
 |
View all Canon imagePROGRAF iPF650 manuals
Add to My Manuals
Save this manual to your list of manuals |
Canon imagePROGRAF iPF650 manual content summary:
- Canon imagePROGRAF iPF650 | iPF650 655 750 755 Basic Guide Step3 - Page 1
the Roll Holder to Rolls 12 Loading Rolls in the Printer 14 Removing the Roll from the Printer 16 Loading Sheets in the Printer 18 Removing Sheets 20 Consumables 21 Replacing Ink Tanks 22 Replacing the Maintenance Cartridge 26 Replacing the Printhead 30 Menu Map 35 Troubleshooting - Canon imagePROGRAF iPF650 | iPF650 655 750 755 Basic Guide Step3 - Page 2
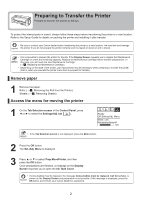
new Maintenance Cartridge. (→ , Replacing the Maintenance Cartridge) • Depending on the state of the printer, part replacement may be necessary when preparing to transfer the printer (that is, when you execute the printer menu item to prepare for transfer). Remove paper 1 Remove the paper. Rolls - Canon imagePROGRAF iPF650 | iPF650 655 750 755 Basic Guide Step3 - Page 3
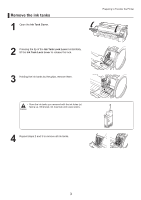
the tip of the Ink Tank Lock Lever horizontally, lift the Ink Tank Lock Lever to release the lock. Preparing to Transfer the Printer 3 Holding the ink tanks by the grips, remove them. • Store the ink tanks you removed with the ink holes (a) a facing up. Otherwise, ink may leak and cause - Canon imagePROGRAF iPF650 | iPF650 655 750 755 Basic Guide Step3 - Page 4
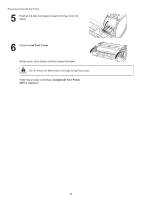
to Transfer the Printer 5 Push all ink tank lock levers closed until they click into place. 6 Close the Ink Tank Cover. At this point, ink is drawn out from inside the tubes. • Do not remove the Maintenance Cartridge during this process. When the process is finished, Completed! Turn Power Off!! is - Canon imagePROGRAF iPF650 | iPF650 655 750 755 Basic Guide Step3 - Page 5
it is off and transfer it in that state. If you accidentally unplug the printer, plug it in again, reinstall the ink tanks, and follow this procedure again. 2 Disconnect the power cord and interface cable. 3 Tape down printer covers to secure them, in the reverse order of tape removal during - Canon imagePROGRAF iPF650 | iPF650 655 750 755 Basic Guide Step3 - Page 6
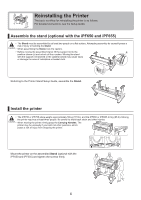
the printer is as follows. For detailed instructions, see the Setup Guide. support rod lowered or the casters locked may cause injury or damage the area of installation or basket cloth. OFF Referring to the Printer Stand Setup Guide, assemble the Stand. Install the printer • The iPF750 or iPF755 - Canon imagePROGRAF iPF650 | iPF650 655 750 755 Basic Guide Step3 - Page 7
attached to the printer. Reinstalling the Printer Connect the power cord Connect the power cord to the Power Supply Connector on the right side of the printer. Plug the power cord into the outlet. Turn the printer on Press the power button to turn the printer on. OK Install the ink tanks Open the - Canon imagePROGRAF iPF650 | iPF650 655 750 755 Basic Guide Step3 - Page 8
Attaching the Roll Holder to Rolls) Load the roll in the printer Load the roll in the printer. (→ , Loading Rolls in the Printer) Install the printer driver and manual Note that the driver installation procedure varies depending on the type of connection. (→ , Installing the Printer Driver (Windows - Canon imagePROGRAF iPF650 | iPF650 655 750 755 Basic Guide Step3 - Page 9
these steps to install the printer driver and User Manual. Installing the printer driver and User Manual • When setting up a USB connection, connect the printer and computer with the USB cable during printer driver installation following the instructions displayed. If you accidentally connect - Canon imagePROGRAF iPF650 | iPF650 655 750 755 Basic Guide Step3 - Page 10
window, select Restart my computer now and click Restart. Printer driver settings take effect after the computer restarts. Next, install the User Manual. 5 When the Install User Manual dialog box is displayed, insert the provided User Software CD-ROM in the CDROM drive and follow the instructions - Canon imagePROGRAF iPF650 | iPF650 655 750 755 Basic Guide Step3 - Page 11
instructions, see the Setup Guide. Compatible operating systems Mac OS X 10.3.9 or later Supported connection methods The printer driver works over USB or network (Bonjour or IP) connections. Follow these steps to install the printer driver and user manual. Installing the printer driver and user - Canon imagePROGRAF iPF650 | iPF650 655 750 755 Basic Guide Step3 - Page 12
Driver (Mac OS X) 5 After installation, click Quit. Installation of the printer driver is now finished. Next, register the printer to set up. 6 Click Next and follow the instructions displayed to register the printer to set up and update the paper information. Next, install the user manual - Canon imagePROGRAF iPF650 | iPF650 655 750 755 Basic Guide Step3 - Page 13
features of the printer driver. For detailed printer driver instructions, see the User Manual. Print Preview Using the print preview function enables the following. • Check an image of the document as arranged on the paper, in the position it will be printed. You can reduce printing costs by - Canon imagePROGRAF iPF650 | iPF650 655 750 755 Basic Guide Step3 - Page 14
Convenient Printer Driver Features Rotate Page 90 degrees (Conserve Paper) You can conserve roll paper by specifying particular settings as suitable for your original. When originals are printed in portrait orientation, the original is rotated 90 degrees before printing if it fits within the roll - Canon imagePROGRAF iPF650 | iPF650 655 750 755 Basic Guide Step3 - Page 15
Printer Driver Features 3mm 3mm Mac OS X • Access the Page Setup pane. • Select the Enlarged/Reduced Printing check box. • Select the Borderless Printing check box. • Select either Fit Paper Size or Fit Roll Paper Width. • Borderless printing is possible when the Page Size setting matches - Canon imagePROGRAF iPF650 | iPF650 655 750 755 Basic Guide Step3 - Page 16
of roll paper by completing simple printer driver settings. The printer supports roll printing up to a maximum length of 18.0 m (19.7 yd). Roll width Create an original 100 x 500 mm Print Automatically Enlarged About five times as long as the roll width Instructions in Windows and Mac OS Windows - Canon imagePROGRAF iPF650 | iPF650 655 750 755 Basic Guide Step3 - Page 17
list, click the size of the original as specified in the source application. • Select the Enlarged/Reduced Printing check box. • Select Fit Paper Size, Fit Roll Paper Width, or Scaling. Convenient Printer Driver Features Mac OS X • Access the Page Setup pane. • Make sure the width of the loaded - Canon imagePROGRAF iPF650 | iPF650 655 750 755 Basic Guide Step3 - Page 18
Using the HDI Driver to Print (Windows) Main features of the HDI Driver are as follows. • This is a specialized printer driver compatible with the HDI(Heidi Device Interface) architecture of Autodesk CAD software such as AutoCAD and AutoCAD LT (both referred to as AutoCAD in this manual, for - Canon imagePROGRAF iPF650 | iPF650 655 750 755 Basic Guide Step3 - Page 19
3 Ink tank removal 3 IP address 9, 11 l Large-format printing 16 m Mac OS X 11 p Packing the printer 5 Page Composer 13 Paper removal 2 Power Supply Connector 7 Printer driver installation 9, 11 r Reinstalling the printer 6 Roll Holder 8 s Stand 6 t Transfer preparations 2 w Windows 9 - Canon imagePROGRAF iPF650 | iPF650 655 750 755 Basic Guide Step3 - Page 20
1185 XB Amstelveen The Netherlands Canon (China) Co., Ltd. 15F Jinbao Building No.89 Jinbao Street, Dongcheng District, Beijing 100005, China Canon Australia Pty. Ltd. 1 Thomas Holt Drive, North Ryde, Sydney, N.S.W.2113, Australia QT5-2300-V1 ©CANON INC. 2009 * QT 5 2 3 0 0V1 * Printed in JAPAN
-
 1
1 -
 2
2 -
 3
3 -
 4
4 -
 5
5 -
 6
6 -
 7
7 -
8
-
9
-
10
-
11
-
12
-
13
-
14
-
15
-
16
-
17
-
18
-
19
-
20
 |
 |

Printer Relocation
Printer Driver
Installation
3
1
Printer Operations
2
Troubleshooting
Read this manual before attempting to operate the printer.
Keep this manual in a handy location for future referencing.
This Basic Guide includes three booklets.
Large-Format Printers
Be sure to read "
Safety Precautions" in the
fi
rst
booklet,
Printer Operations.
ENG
3
Printer Relocation
Printer Driver Installation
Basic Guide
Preparing to Transfer the Printer
......................
2
Reinstalling the Printer
.....................................
6
Installing the Printer Driver (Windows)
.............
9
Installing the Printer Driver (Mac OS X)
.........
11
Convenient Printer Driver Features
................
13
Troubleshooting
................................................
2
If Roll Paper Jams
..........................................
18
If a Sheet Jams
...............................................
21
If Paper is Soiled
............................................
23
If Printing is Faint
............................................
25
If Vertical Lines are Warped or Colors are
Misaligned
..................................................
26
If Banding Occurs
...........................................
28
If Line Length Does Not Match
.......................
30
Error Messages
..............................................
32
Safety Precautions
........................................
2
Types of manuals
.............................................
5
Documentation Conventions
............................
6
Parts
.................................................................
8
Attaching the Roll Holder to Rolls
...................
12
Loading Rolls in the Printer
............................
14
Removing the Roll from the Printer
................
16
Loading Sheets in the Printer
.........................
18
Removing Sheets
...........................................
20
Consumables
..................................................
21
Replacing Ink Tanks
.......................................
22
Replacing the Maintenance Cartridge
............
26
Replacing the Printhead
.................................
30
Menu Map
.......................................................
35