Casio CW-75 User Guide - Page 54
To print a label with text in both areas, Label 1 and Label 2
 |
UPC - 079767163815
View all Casio CW-75 manuals
Add to My Manuals
Save this manual to your list of manuals |
Page 54 highlights
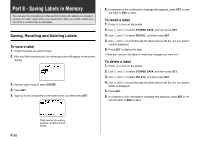
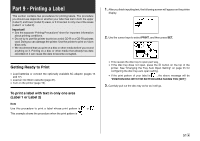
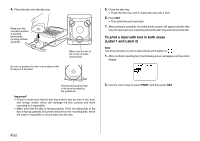
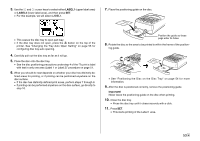
4. Place the disc onto the disc tray. Make sure the recording surface is pointing downwards (printing surface upwards). Be sure to position the disc in accordance with the layout of the label. Make sure the disc is not on top of these raised areas. 5. Close the disc tray. • Press the disc tray until it closes securely with a click. 6. Press SET. • This starts the print operation. 7. After printing is complete, the initial printer screen will appear and the disc tray will open part way. Carefully pull out the disc tray and remove the disc. To print a label with text in both areas (Label 1 and Label 2) Note Use this procedure to print a label whose print pattern is . 1. After you finish inputting text, the following screen will appear on the printer display. Printing will be performed in the area bounded by the guidelines. Important! • Check to make sure that the disc tray and the disc are free of dirt, dust, and foreign matter, which can damage the disc surface and make recording to it impossible. • Make sure that the disc is facing properly. If the recording side of the disc is facing upwards, the printer will print on the recording side, which will make it impossible to record data onto the disc. 2. Use the cursor keys to select PRINT, and then press SET. E 52
-
 1
1 -
2
-
3
-
4
-
5
-
6
-
7
-
8
-
9
-
10
-
11
-
12
-
13
-
14
-
15
-
16
-
17
-
18
-
19
-
20
-
21
-
22
-
23
-
24
-
25
-
26
-
27
-
28
-
29
-
30
-
31
-
32
-
33
-
34
-
35
-
36
-
37
-
38
-
39
-
40
-
41
-
42
-
43
-
44
-
45
-
46
-
47
-
48
-
 49
49 -
 50
50 -
 51
51 -
 52
52 -
 53
53 -
 54
54 -
 55
55 -
 56
56 -
 57
57 -
 58
58 -
 59
59 -
60
-
61
-
62
-
63
-
64
-
65
-
66
-
67
-
68
-
69
-
70
 |
 |
