Celestron Travel Scope 60 DX Portable Telescope with Smartphone Adapter Travel - Page 6
Finderscope
 |
View all Celestron Travel Scope 60 DX Portable Telescope with Smartphone Adapter manuals
Add to My Manuals
Save this manual to your list of manuals |
Page 6 highlights
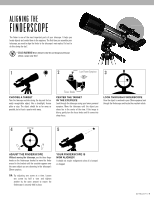
ALIGNING THE FINDERSCOPE The finder is one of the most important parts of your telescope. It helps you locate objects and center them in the eyepiece. The first time you assemble your telescope, you need to align the finder to the telescope's main optics. It's best to do this during the day*. * SOLAR WARNING! Never attempt to view the sun through any telescope without a proper solar filter! 1 2 Low Power Eyepiece 3 CHOOSE A TARGET Take the telescope outside during the day and find an easily recognizable object, like a streetlight, license plate or sign. The object should be as far away as possible, but at least a quarter mile away. Focus Knobs CENTER THE TARGET IN THE EYEPIECE Look through the telescope using your lower powered eyepiece. Move the telescope until the object you chose lies in the center of the view. If the image is blurry, gently turn the focus knobs until it comes into sharp focus. LOOK THROUGH FINDERSCOPE Once the object is centered in your 20mm eyepiece, look through the finderscope and locate the crosshair reticle. 4 5 ADJUST THE FINDERSCOPE Without moving the telescope, use the three finger knobs on the finderscope bracket to move the finder around in the bracket until the crosshair appears over the same object you are observing in the telescope's 20mm eyepiece. TIP: Try adjusting one screw at a time. Loosen one screw by half a turn and tighten another by the same amount to ensure the finderscope is securely held in place. YOUR FINDERSCOPE IS NOW ALIGNED! It should not require realignment unless it is bumped or dropped. ENGLISH | 5
-
 1
1 -
 2
2 -
 3
3 -
 4
4 -
 5
5 -
 6
6 -
 7
7 -
 8
8 -
 9
9 -
 10
10 -
 11
11 -
 12
12 -
13
-
14
-
15
-
16
-
17
-
18
-
19
-
20
-
21
-
22
-
23
-
24
-
25
-
26
-
27
-
28
-
29
-
30
-
31
-
32
 |
 |
