Compaq 12XL500 Models XL300, XL300A, and XL300B - Maintenance & Service Gu - Page 101
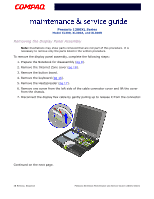
Removing the Display Panel Assembly, Remove the Internet Zone cover
 |
UPC - 720591756062
View all Compaq 12XL500 manuals
Add to My Manuals
Save this manual to your list of manuals |
Page 101 highlights
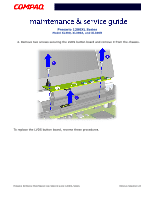
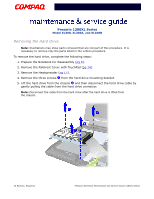
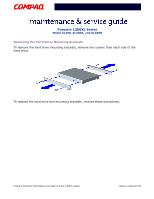
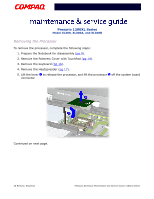
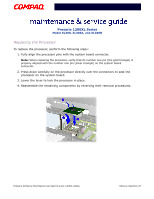
Presario 1200XL Series Model XL300, XL300A, and XL300B Removing the Display Panel Assembly Note: Illustrations may show parts removed that are not part of this procedure. It is necessary to remove only the parts listed in the written procedure. To remove the display panel assembly, complete the following steps: 1. Prepare the Notebook for disassembly (pg 9). 2. Remove the Internet Zone cover (pg 18). 3. Remove the button board. 4. Remove the keyboard (pg 16). 5. Remove the Heatspreader (pg 17). 6. Remove one screw from the left side of the cable connector cover and lift the cover from the chassis. 7. Disconnect the display flex cable by gently pulling up to release it from the connector. Continued on the next page. 28 REMOVAL SEQUENCE PRESARIO NOTEBOOK MAINTENANCE AND SERVICE GUIDE 1200XL SERIES
-
 1
1 -
2
-
3
-
4
-
5
-
6
-
7
-
8
-
9
-
10
-
11
-
12
-
13
-
14
-
15
-
16
-
17
-
18
-
19
-
20
-
21
-
22
-
23
-
24
-
25
-
26
-
27
-
28
-
29
-
30
-
31
-
32
-
33
-
34
-
35
-
36
-
37
-
38
-
39
-
40
-
41
-
42
-
43
-
44
-
45
-
46
-
47
-
48
-
49
-
50
-
51
-
52
-
53
-
54
-
55
-
56
-
57
-
58
-
59
-
60
-
61
-
62
-
63
-
64
-
65
-
66
-
67
-
68
-
69
-
70
-
71
-
72
-
73
-
74
-
75
-
76
-
77
-
78
-
79
-
80
-
81
-
82
-
83
-
84
-
85
-
86
-
87
-
88
-
89
-
90
-
91
-
92
-
93
-
94
-
95
-
 96
96 -
 97
97 -
 98
98 -
 99
99 -
 100
100 -
 101
101 -
 102
102 -
 103
103 -
 104
104 -
 105
105 -
 106
106 -
107
-
108
-
109
-
110
-
111
-
112
-
113
-
114
-
115
-
116
-
117
-
118
-
119
-
120
-
121
-
122
-
123
-
124
-
125
-
126
-
127
-
128
-
129
-
130
-
131
-
132
-
133
 |
 |
