Compaq BL10e HP ProLiant BL e-Class System Setup and Installation Guide - Page 40
Installing the Interconnect Tray, Press the port-colored latch to release one hot-plug power supply 1.
 |
UPC - 613326445501
View all Compaq BL10e manuals
Add to My Manuals
Save this manual to your list of manuals |
Page 40 highlights
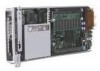
Installing and Cabling the System Installing the Interconnect Tray Before installing an interconnect tray into the enclosure, you must first purchase one as an option. The Integrated Administrator module is included with each interconnect tray. NOTE: The installation procedure is the same for any interconnect tray. To install the interconnect tray: 1. Press the port-colored latch to release one hot-plug power supply (1). NOTE: Port-color indicates hot-plug components. 2. Open the handle (2). 3. Slide the hot-plug power supply out of the enclosure (3). Figure 3-1: Removing a hot-plug power supply 4. Repeat steps 1 through 3 to remove the other hot-plug power supply. 3-2 HP ProLiant BL e-Class System Setup and Installation Guide
-
 1
1 -
2
-
3
-
4
-
5
-
6
-
7
-
8
-
9
-
10
-
11
-
12
-
13
-
14
-
15
-
16
-
17
-
18
-
19
-
20
-
21
-
22
-
23
-
24
-
25
-
26
-
27
-
28
-
29
-
30
-
31
-
32
-
33
-
34
-
 35
35 -
 36
36 -
 37
37 -
 38
38 -
 39
39 -
 40
40 -
 41
41 -
 42
42 -
 43
43 -
 44
44 -
 45
45 -
46
-
47
-
48
-
49
-
50
-
51
-
52
-
53
-
54
-
55
-
56
-
57
-
58
-
59
-
60
-
61
-
62
-
63
-
64
-
65
-
66
-
67
-
68
-
69
-
70
-
71
-
72
-
73
-
74
-
75
-
76
-
77
-
78
-
79
-
80
-
81
-
82
-
83
-
84
-
85
-
86
-
87
-
88
-
89
-
90
-
91
-
92
-
93
-
94
-
95
-
96
-
97
-
98
-
99
-
100
-
101
-
102
-
103
-
104
-
105
-
106
-
107
-
108
-
109
-
110
-
111
-
112
-
113
-
114
-
115
-
116
-
117
-
118
-
119
-
120
-
121
-
122
-
123
-
124
-
125
-
126
-
127
-
128
-
129
-
130
-
131
-
132
-
133
-
134
-
135
-
136
-
137
-
138
-
139
-
140
-
141
-
142
-
143
-
144
-
145
-
146
-
147
-
148
-
149
-
150
-
151
-
152
-
153
-
154
-
155
-
156
 |
 |

Installing and Cabling the System
Installing the Interconnect Tray
Before installing an interconnect tray into the enclosure, you must first purchase one
as an option. The Integrated Administrator module is included with each interconnect
tray.
NOTE:
The installation procedure is the same for any interconnect tray.
To install the interconnect tray:
1.
Press the port-colored latch to release one hot-plug power supply (1).
NOTE:
Port-color indicates hot-plug components.
2.
Open the handle (2).
3.
Slide the hot-plug power supply out of the enclosure (3).
Figure 3-1:
Removing a hot-plug power supply
4.
Repeat steps 1 through 3 to remove the other hot-plug power supply.
3-2
HP ProLiant BL e-Class System Setup and Installation Guide