Craftsman 21217 Operation Manual - Page 15
Mount,ng, Warnine
 |
View all Craftsman 21217 manuals
Add to My Manuals
Save this manual to your list of manuals |
Page 15 highlights
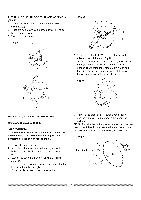
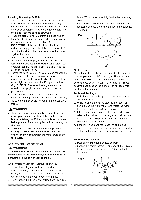
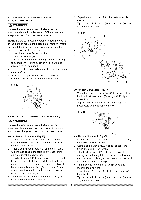
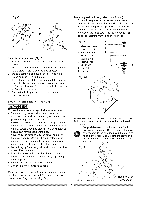
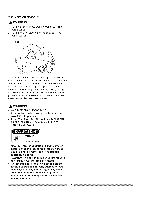
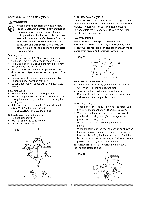
Fig. O 10 12 Mounting instructions (if stand is not used) 1. For stationary use, place the saw in the desired location, directly on a workbench where there is room for handling and proper support of the workpiece. The base of the saw has four mounting holes. Bolt the base of the miter saw (1) to the workbench (5), using the fastening method as shown in Fig P. 33.9° BevelAdjustment(Fig.O) 1. Pushthebeveldetenpt in(10)intowardthefrontof theunit. 2. Unlockthebevelockhandleandtiltthecuttingarm tothecrownmoldingpositivestopat 33.9°. 3. Usinga combinatiosnquarec, hecktoseeifthe bladeangleis 33.9° tothetable. 4. If thebladeis notat33.9° tothemitertable,loosen Iocknu(t11)thenturnthebevelangleadjustingbolt (12)inor outwitha 10mmwrenchuntilthebladeis at33.9° tothe mitertable. 5. Securethelockingnut(11)intopositionafter alignmenist achieved. MOUNTT,NNMEG,TESAW P) ,a,WARNIN! e To avoid injury from unexpected saw movement: o Before moving the saw, disconnect the power cord from the outlet, and lock the cutting arm in the lower position using the hold down latch. NOTE: The hold down latch is for carrying or storing the tool. It is not to be used for holding the saw while cutting. Lower blade and press in hold down latch to secure saw for transport or storage. o Never carry the miter saw by the power cord or by the switch handle. Carrying the tool by the power cord could cause damage to the insulation or wire connections resulting in electric shock or fire. o To avoid injury from flying debris, do not allow visitors to stand behind the saw. o Place the saw on a firm, level work-surface where there is room for handling and properly supporting the workpiece. o Support the saw on a level work surface. o Bolt or clamp the saw to its support. Fig. P 1. Miter saw base 2. Hex head bolt 3. Rubber washer 4. Flat washer 5. Workbench 6. Flat washer 7. Lockwasher 8. Hex nut 9. Jam nut Fig. P-1 2 3 4 1 5 t ...... 7 II II II Ii 8 9 NOTE: Mounting hardware is not included with this tool. Bolts, nuts, washers, and screws must be purchased separately. 2. For portable use, place the saw on a 3/4 in. thick piece of plywood. Bolt the base of the miter saw securely to the plywood using the mounting holes on the base. Use C-clamps to clamp this mounting board to a stable work surface at the worksite. Fig. Q Place the saw in the desired location, either on a work bench or recommended leg set. The base of the saw has four mounting holes (1). (Fig. P-l) 3/4 Inch 15 Hand Hold for Transportation
-
 1
1 -
2
-
3
-
4
-
5
-
6
-
7
-
8
-
9
-
 10
10 -
 11
11 -
 12
12 -
 13
13 -
 14
14 -
 15
15 -
 16
16 -
 17
17 -
 18
18 -
 19
19 -
 20
20 -
21
-
22
-
23
-
24
-
25
-
26
-
27
-
28
 |
 |
