Craftsman 21217 Operation Manual - Page 19
IA,wA,.I.G]
 |
View all Craftsman 21217 manuals
Add to My Manuals
Save this manual to your list of manuals |
Page 19 highlights
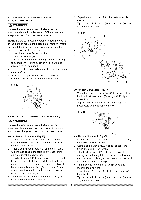
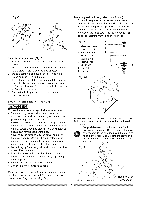
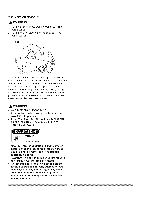
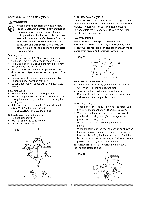
[,_ WARNING i NPreovpeerr pplaocseitiohnainngds noef ayrouthr ebcoudtytingandarheaan. ds when operating the miter saw will make cutting easier and safer. Keep children away. Keep all visitors at a safe distance from the miter saw. Make sure bystanders are clear of the saw and workpiece. Don't force the saw. It will do the job better and safer at its designed rate. Starting a cut: o Place hands at least 8-3/4 in. away from the path of the blade - out of the "no-hands zone" (1). (Fig. S) o Hold workpiece firmly against the fence to prevent movement toward the blade. o With the power switch OFF, bring the saw blade down to the workpiece to see the cutting path of the blade. o Press in lock-off switch in trigger switch handle. o Squeeze trigger switch to start saw. o Lower blade into workpiece with a firm downward motion. Finishing a cut: o Hold the cutting arm in the down position. o Release trigger switch and wait for all moving parts to stop before moving your hands and raising the cutting arm. o If the blade doesn't stop within 6 seconds, unplug the saw and follow the instructions in TROUBLESHOOTING GUIDE section. Before freeing jammed material: o Release trigger switch. o Wait for all moving parts to stop. o Unplug the miter saw. Fig. S TURNING SAW ON (FIG. T) To reduce the likelihood of accidental starting, a thumb activated lock-OFF switch is located on top of the switch handle. The lock-OFF switch (1) must be pressed forward before the trigger switch (2) can be activated and the miter saw started. IA,wA,.I.G] Make the switch child-proof. Insert a padlock through the hole (3) in the trigger switch and lock it. This will prevent children and other unauthorized users from engaging the trigger switch ON. Fig. T 1 BEFORE LEAVING THE SAW o Never leave tool running unattended. Turn power OFF. Wait for all moving parts to stop. o Make workshop child- proof. Lock the shop. Disconnect master switches. Store tool away from children and other unqualified users. MITER CUT (FIG. U) 1. When a miter cut is required, unlock the miter table by turning the miter handle (1) counterclockwise. 2. While holding the miter handle, press down on the positive stop locking lever (2) to disengage the positive stop locking lever. 3. Rotate the miter table to the right or left with the miter handle. 4. When the table is in the desired position as shown on the miter scale (3), release the positive stop locking lever handle and tighten the miter handle. The table is now locked at the desired angle. Positive stops are provided at 0°,15 °, 22.5 °, 31.6 ° and 45 ° . iMPORTANT: ALWAYS TIGHTEN the miter table lock handle before cutting. Fig. U _
-
 1
1 -
2
-
3
-
4
-
5
-
6
-
7
-
8
-
9
-
10
-
11
-
12
-
13
-
 14
14 -
 15
15 -
 16
16 -
 17
17 -
 18
18 -
 19
19 -
 20
20 -
 21
21 -
 22
22 -
 23
23 -
 24
24 -
25
-
26
-
27
-
28
 |
 |
