Craftsman 21833 Operation Manual
Craftsman 21833 - Professional Contractor Table Saw Manual
 |
View all Craftsman 21833 manuals
Add to My Manuals
Save this manual to your list of manuals |
Craftsman 21833 manual content summary:
- Craftsman 21833 | Operation Manual - Page 1
Operator's Manual CRAFTSMAN 10" CONTRACTOR TABLE SAW Model No. 351.218330 CAUTION: Read and follow all Safety Rules and Operating Instructions before First Use of this Product. Keep this Manual with Tool. Sears, Roebuck and Co., Hoffman Estates, IL 60179 U.S.A. www, sears.com/craftsman 31105,00 - Craftsman 21833 | Operation Manual - Page 2
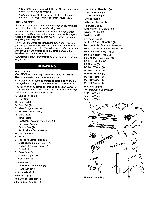
Warranty Safety Rules Unpacking Assembly Installation Operation Maintenance Repair Protection Agreement Troubleshooting Parts Illustration and List Espafiol 2 2-5 5 6-8 8-9 9-13 13 14 16-17 18-29 30-47 ONE-YEAR FULL WARRANTY ON CRAFTSMAN TOOL if this Craftsman toolfails due to a defect - Craftsman 21833 | Operation Manual - Page 3
extra caution when the guard assembly is removed for resawing, dadoing, or rabbeting--replace guard as soon as that operation is completed. • Never turn the saw ON before clearing the table of all tools, wood scraps, etc., except the workpiece and related feed or support devices for the operation - Craftsman 21833 | Operation Manual - Page 4
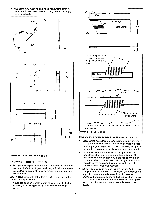
fence or rip fence extension to keep work on the table. + I ¾,, J I Rip Fence I Table ,-- 13A,, Miter slot I I .......,.I. Blade II i 5 +1 !I_12" + ' + i p to table to guide slitting blades), wire wheels or buffing wheels. USE ONLY ACCESSORIES DESIGNED FOR SAW • Crosscutting operations - Craftsman 21833 | Operation Manual - Page 5
replacement. The table saw body comes assembled as one unit. Additional parts which need to be fastened to the saw should be located and accounted for before assembling: A Extension Tab]e (2) B Dust Chute C Front Rail (2) D Rear Rail (2) E Miter Gauge Assembly F Blade Guard Assembly G Dado Insert - Craftsman 21833 | Operation Manual - Page 6
. Refer to Figures 3, 4, 5, 7, 8, 9 and 10. CAUTION: Do not attempt assembly if parts are missing. Use this manual to order replacement parts. Be certain all parts are clean and free of shipping preservative. Also, completely remove all parts of packing. Saw cabinet should be directly on the floor - Craftsman 21833 | Operation Manual - Page 7
. RAIL ASSEMBLY Refer to Figure 11, page 22. ° Insert two M8 x 28 hex head bolts and two M8 x 25 hex head bolts into the T-slot of the right front guide rail (Key Nos. 16, 21, and 22) (The two longer bolts will attach to the table; the two shorter bolts attach to the table extension.) • Attach - Craftsman 21833 | Operation Manual - Page 8
The mitergauge is guidedthroughthe T-slotwith a roller guide at the frontof guidebar. To insertmiter gauge, first insert rollerguideintoT-slotat front of table. ELECTRICAL CONNECTIONS GROUNDING INSTRUCTIONS WARNING: improperconnectionof equipmentgrounding conductorcan resultin the riskofelectricasl - Craftsman 21833 | Operation Manual - Page 9
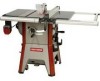
Number 218330 contractor saw offers precise cutting performance for all woods up to 3_" thick. The saw is designed for the professional user and is ruggedly constructed for continuous service. The 10" Saw is recommended for use with a 10" blade. The saw features an extra large cast iron table. Saw - Craftsman 21833 | Operation Manual - Page 10
Fence Dimensions: Rip fence Rip fence rails (front and rear Blade capacity maximum Blade arbor Dado blade capacity maximum 31¼" 56_" 10" %" ,¾g' Saw Constructions: Cabinet Table Totallyenclosedsteel panel Cast height to allow for greater blade clearance. • Lock blade height into position - Craftsman 21833 | Operation Manual - Page 11
(Key No. 42) as needed and recheck. • The table insert is equipped with a finger hold for easy removal. MITER GAUGE ADJUSTMENT • Miter gauge supplied with saw is equipped with individually adjustable index stops at 0° and 45 °, right and left, and can be manually adjusted up to 60 ° right and left - Craftsman 21833 | Operation Manual - Page 12
WARNING: Before connecting the table saw to the power source or operating the saw, always inspect the blade guard assembly and riving knife for proper alignment and clearance with saw blade. Check alignment after each change of bevel angle. WARNING: When possible, place the fence on the right side - Craftsman 21833 | Operation Manual - Page 13
with saw (Dado Insert, Part No. 31158.OO). When using a dado set, the following parts must be substituted dado table insert (not included). IMPORTANT: Always use correct insert. When using the dado set, use caution. Use featherboards and push sticks as applicable. WARNING: Always immediately replace - Craftsman 21833 | Operation Manual - Page 14
10% from regular price of service and related installed parts not covered by the agreement; also, 10% off regular price of preventive maintenance check [] Fast help by phone - we call it Rapid Resolution phone support from a Sears representative. Think of us as a "talking owner's manual." Once you - Craftsman 21833 | Operation Manual - Page 15
Service Record Craftsman 10" Contractor Table Saw DATE MAINTENANCE PERFORMED REPLACEMENT PARTS REQUIRED 15 - Craftsman 21833 | Operation Manual - Page 16
1. Extension cord too light or too long 2. Low shop voltage 3. Motor not wired for correct voltage 1. Dull blade with improper tooth set 2, Blade is binding at one end of cut (heeling) 3, Warped board 4. Rip fence not parallel to blade 5, Riving knife out of alignment 6. Excessive feed rate Positive - Craftsman 21833 | Operation Manual - Page 17
SYMPTOM Saw makes unsatisfactory cut POSSIBLE CAUSE(S) 1, Dull blade 2. Blade mounted backwards 3. Gum or pitch on blade 4. Incorrect blade for cut 5. Gum or pitch on table CORRECTIVE ACTION 1. Sharpen or replace blade 2. Turn blade around 3. Remove blade and clean 4. Change blade to correct type - Craftsman 21833 | Operation Manual - Page 18
Model 351.21 8330 Figure 9 - Replacement Parts Illustration for Rip Fence 24 2O / B_ 8 11 3 18 - Craftsman 21833 | Operation Manual - Page 19
16 17 18 19 20 21 22 23 24 25 26 27 28 29 3O 31 PART NO. 09845.00 31107.00 31108.00 31109.00 31110.00 31111.00 01923.00 31112 Spring Pin Adjusting Plate 3CMI-5 E-Ring Adjusting Plate Adjusting Screw Base Nylon Screw Lens 4ram Flat Washer* 4-0.7 x 8ram Flat Head Screw Fence 8ram Flat Washer* - Craftsman 21833 | Operation Manual - Page 20
Model 351.218330 Figure 10 - Replacement Parts Illustration for Cabinet 24 11 19 14f 22 \ 16 18 15 3 20 - Craftsman 21833 | Operation Manual - Page 21
25 26 PART NO, 31125 Plate Right Panel 4mm Flat Washer* 4mm Lock Washer* 4-0.7 x 10mm Pan Head Screw* 8-1.25mm Hex Nut* Rubber Pad Wrench Knob Left Rear Corner Support Rear Panel Right Rear Corner Support 8-t .25 x 30mm Hex Head Bolt* Standan hardware item available locally. RECOMMENDED ACCESSORY - Craftsman 21833 | Operation Manual - Page 22
Figure 71 Model35!.21833O "Replacement Parts Illustration for Rails 19 1 31 / 28 - Craftsman 21833 | Operation Manual - Page 23
45 A & PART NO. 31138.00 Relief Tapping Screw Switch Plate 6-1.0 x 12mm Pan Table Extension I0-1.25 x 25mm Hex Head Bolt* 10ram Lock Washer* 10mm Flat Washer* Tabte Left Rear Rail Cap Table ]nseri 5-0.8 x 10ram Fiat Head Screw Magnet 8-1.25 x 16mm Set Screw Switch Box Dado Insert Operator's Manual - Craftsman 21833 | Operation Manual - Page 24
0 i €_ m "0 0 m o c o im m N E u | LL 24 - Craftsman 21833 | Operation Manual - Page 25
o • C Z '- c o O-DD ELL ILl mm mmmmm_O __ 5_ O O O O O OO qqqqq!qq ',-- O OOO OOO O _O O qqq,q qq 8_ !o._- V o oJ co _l" cO cO o iOg i"o (.0 i_"o n _ _o_ 00000000_ _O_ o_ rn oo O rn -o rnm "o I- o• TT o J_ o_ "_ " _-'_ oO I.L EmO_ x x .-1 LL E °ET ° o E ,,..To, - Craftsman 21833 | Operation Manual - Page 26
Figure 13 - Replacement Model 351.218330 Parts Illustration for Blade Drive 11 13 14 \\ 33 9 i 78 \ I ,79 II 84 _5 86 _7' _I6 i i [ 7! 53_ 41 4_5 3O \ 31 43 29 3O 27 26 17 16 5_5 - Craftsman 21833 | Operation Manual - Page 27
.00 31195,00 31196.00 07215.00 31197.00 Bevel Stop Support Spacer Handle Assembly Spring 5 x 5 x 15ram Key Arbor 31198.00 Shim 31199 00 31204.00 Bushing Bevel Plate QTY. 1 1 1 1 1 1 1 1 1 1 1 1 1 1 4 7 8 1 1 1 1 I 1 2 2 2 2 1 2 2 1 2 1 2 1 4 4 4 1 1 1 1 1 1 KEY NO. PART NO. 45 O7383.00 - Craftsman 21833 | Operation Manual - Page 28
Model 351.21 8330 Figure 14 - Replacement Parts Illustration for Blade Guard 4 20 21 22 _''_e'117 /is 22 21 _ 20 4 35 28 - Craftsman 21833 | Operation Manual - Page 29
24 25 26 27 28 29 3O "31 32 33 34 35 36 37 PART NO. 31235.00 STD840610 STD851006 31236.00 31237.00 31238.00 31239.00 Guard Bushing Cover 4-0.7 x 15ram Set Screw 4-0.7 x 10mm Flat Head Screw Support Body Right Blade Guard Bushing Plate Pivot Pin 4 x 12mm Spring Pin Latch 3-0.5 x 8mm Set Screw Spring
-
 1
1 -
 2
2 -
 3
3 -
 4
4 -
 5
5 -
 6
6 -
 7
7 -
8
-
9
-
10
-
11
-
12
-
13
-
14
-
15
-
16
-
17
-
18
-
19
-
20
-
21
-
22
-
23
-
24
-
25
-
26
-
27
-
28
-
29
 |
 |
Operator's
Manual
CRAFTSMAN
10"
CONTRACTOR
TABLE SAW
Model No.
351.218330
CAUTION:
Read
and follow
all
Safety
Rules
and Operating
Instructions
before
First
Use of this Product.
Keep
this Manual
with Tool.
Sears,
Roebuck
and Co., Hoffman
Estates,
IL
60179
U.S.A.
www, sears.com/craftsman
31105,00
Draft (07/01/09)