Craftsman 21833 Operation Manual - Page 5
THINK, SAFETY, Socket - parts
 |
View all Craftsman 21833 manuals
Add to My Manuals
Save this manual to your list of manuals |
Page 5 highlights
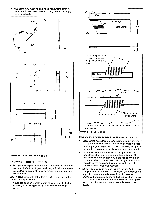
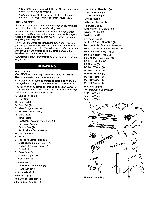
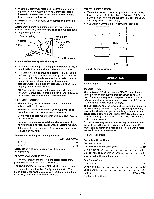
• Adjust table inserts flush with table top. Never operate saw unless proper insert is installed. • Never feed material into the cutting tool from the rear of the saw. An accident and serious injury could result. THINK SAFETY Safety is a combination of operator common sense and alertness at all times when the saw is being used. Never use another person as a substitute for a table extension, or as additional support for a workpiece that is longer or wider than basic saw table, or to assist in feeding, supporting or pulling the workpiece. Do not pull the workpiece through the saw blade--position your body at the infeed side of the guard; start and complete the cut from that same side. This will require added table support for long or wide workpieces that extend beyond the length or width of the saw table. CAUTION: Follow safety instructions that appear on the front of your saw. Refer to Figure 2. CAUTION: Do not attempt assembly if parts are missing. Use this manual to order replacement parts. Check for shipping damage or missing parts. If any parts are damaged or missing, calt 1-800-266-9079 for replacement. The table saw body comes assembled as one unit. Additional parts which need to be fastened to the saw should be located and accounted for before assembling: A Extension Tab]e (2) B Dust Chute C Front Rail (2) D Rear Rail (2) E Miter Gauge Assembly F Blade Guard Assembly G Dado Insert H Tab]e Insert I Handwheel Assembly with Knob (2) J Rip Fence Assembly K Rubber Foot (4) L Antkkickback Pawi Assembly M Line Cord Hooks (2) N Brace O Rip Fence Storage Hooks (2) P Blade Guard Storage Hooks (2) Q Push Stick Storage Hooks (2) R Push Stick S Base Panel (4) T Corner Support (4) U Caster Set (2) Hardware Bag #1 M!0 x 25 Socket Head Bolt (6) M10 Lock Washer (6) M10 Flat Washer (6) Hardware Bag #2 M8 x 28 Hex Head Bolt (8) M8 x 25 Hex Head Bolt (8) M8 x 20 Hex Head Bolt (4) M8 Lock Washer (20) M8 Flat Washer (20) M8 Hex Nut (16) M8 Acorn Hex Nut (4) Hardware Bag #3 M6 x 16 Pan Head Screw (2) M6 Flat Washer (2) M6 Hex Nut (2) Hardware Bag #4 MI0 x 25 Socket Head Bolt (4) M8 x 16 Socket Pan Head Screw (8) M6 x 12 Socket Pan Head Screw (24) M6 x 16 Socket Head Bolt (2) M5 x 12 Socket Head Bolt (4) M3 x 10 Pan Head Screw (4) M10 Lock Washer (4) M6 Hex Nut (2) M5 Lock Washer (4) M3 Lock Washer (4) M10 Flat Washer (4) M6 Flat Washer (2) M5 Flat Washer (4) M3 Flat Washer (4) Hardware Bag #5 10/I3mm Open End Wrench 4mm Hex Wrench 5mm Hex Wrench 8mm Hex Wrench E _F L Q P Figure 2 - Unpacking S a L._ 5
-
 1
1 -
 2
2 -
 3
3 -
 4
4 -
 5
5 -
 6
6 -
 7
7 -
 8
8 -
 9
9 -
 10
10 -
 11
11 -
12
-
13
-
14
-
15
-
16
-
17
-
18
-
19
-
20
-
21
-
22
-
23
-
24
-
25
-
26
-
27
-
28
-
29
 |
 |
