Craftsman 21833 Operation Manual - Page 12
Of Cuts/operations - alignment
 |
View all Craftsman 21833 manuals
Add to My Manuals
Save this manual to your list of manuals |
Page 12 highlights
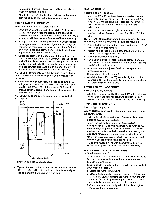
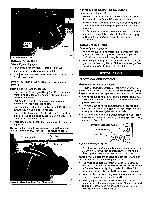
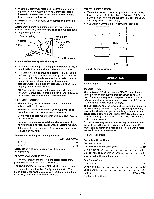
Remove • Loosen the fastening knob. ° Hold the knob and pull the locking pin out. ° Remove the riving knife out of the mounting bracket. NOTE: Make sure blade is at the highest position before adding or removing the riving knife. WARNING: For your own safety, always observe the following safety precautions. ° Never make any cut freehand (without using miter gauge or rip fence). Blade can bind in the cut and cause a kickback. ° Always lock miter gauge or rip fence securely when in use. • Remove rip fence from the table when miter gauge is in use. ° Remove miter gauge from table when rip fence is in use. ° Make sure blade guard is installed for alt "thru sawing" operations. Replace guard immediately after completion of resawing, rabbeting and dadoing. Frequently check action of anti-kickback pawls by passing the workpiece alongside the spreader while saw is off. Pull the workpiece toward you. If the pawls do not dig into the workpiece and hold it, the pawls must be sharpened. (See Maintenance section, page 13.) ° Have blade extend approximately '/8" above top of workpiece. Additional blade exposure increases hazard potential. ° Do not stand directly in front of blade in case of a kickback. Stand to either side of the blade. • Keep your hands clear of the blade and out of the path of the blade. • if the blade stalls or stops while cutting, turn switch OFF and safety disconnect OFF before attempting to free the blade. • Do not reach over or behind the blade to pull the workpiece through the cut, to support long or heavy workpieces, to remove small cut-off pieces of material or for any other reason. • Do not pick up small pieces of cut-off material from the table. Remove them by pushing them off table with a long stick. Otherwise they could be thrown back at you by the rear of the blade. • Do not remove small pieces of cut-off material that may become trapped inside blade guard while saw is on. This could endanger your hands or cause a kickback. "liJrn saw off. After blade has stopped turning, lift guard and remove the piece. ° Always lower blade below the table level when machine is not in use. TYPES OF CUTS/OPERATIONS CROSSCUTTING WARNING; Use caution when starting the cut to prevent binding of the guard against the workpiece. Performed with miter gauge set at "0". Crosscutting is known as cutting work across the grain at 90 °, or square with both the edge and the flat side of the wood. MITER CUTTING WARNING: Miter angles greater than 45" may force the blade guard assemblyintothe saw bladecausing damage to the blade guard assemblyand personalinjury. Before starting the motor, test the operation by feeding the workpiece into the blade guard assembly. If the blade guard assembly contacts the blade, place the workpiece under the blade guard assembly, not touching the blade, before starting the motor. WARNING: Certain workpiece shapes, such as molding may not lift the blade guard assembly properly. With the power off, feed the workpiece slowly into the blade guard area and until the workpiece touches the brade. If the blade guard assembly contacts the blade, place the workpiece under the blade guard assembly, not touching the blade, before starting the motor. Performed with miter gauge, is known as cutting wood at an angle other than 90 ° with the edge of the wood. BEVEL CROSSCUTTING WARNING: When possible, use the right miter gauge slot when bevel crosscuttingso that the blade tilts away from the miter gauge and yourhands. WARNING: Use cautionwhen startingthe cutto prevent binding of the guard againstthe workpiece. Performedwith mitergauge, is same as crosscuttingexcept that the wood is also cut at an angle otherthan 90° withthe flat side of the wood(blade is at an angle). COMPOUND MITER CUTTING Performed with miter gauge, is a combination of miter cutting and bevel crosscuttingC. ut is made at angle otherthan 90° to both the edge and flat side of wood. RIPPING WARNING: When bevel ripping and whenever possible, place the fence on the side of the blade so that the blade is tilted away from the fence and hands. Keep hands clear of the blade and use a push stick to feed the workpiece if there is less than 6" between the fence and the blade. Performed with rip fence, is known as cutting a piece of wood with the grain or lengthwise. Position the fence to the desired width of rip and lock in place. When ripping long boards or large panels always use a work support. BEVEL RIPPING WARNING: Before connecting the table saw to the power source or operating the saw, always inspect the blade guard assembly and riving knife for proper alignment and clearance with saw blade. Check alignment after each change of bevel angle. WARNING: When possible, place the fence on the right side of the blade so that the blade is tilted away from the fence and hands. Keep your hands clear of the blade and use a pushstick to feed the workpiece if there is less than 6" between the fence and the blade. Performed with rip fence, the same as ripping. However, blade is set at an angle other than 90 ° . RESAWlNG Performed with rip fence, is known as ripping a piece of wood through its thickness. Do not attempt to resaw bowed or warped material. NOTE: It may be necessary to remove blade guard and use work supports as well as push blocks when performing this operation. WARNING: Install blade guard immediately upon completion of resawing operation. 12
-
 1
1 -
2
-
3
-
4
-
5
-
6
-
 7
7 -
 8
8 -
 9
9 -
 10
10 -
 11
11 -
 12
12 -
 13
13 -
 14
14 -
 15
15 -
 16
16 -
 17
17 -
18
-
19
-
20
-
21
-
22
-
23
-
24
-
25
-
26
-
27
-
28
-
29
 |
 |
