Dell C1048P Port Extender Networking C1048P Getting Started Guide
Dell C1048P Port Extender Manual
 |
View all Dell C1048P Port Extender manuals
Add to My Manuals
Save this manual to your list of manuals |
Dell C1048P Port Extender manual content summary:
- Dell C1048P Port Extender | Networking C1048P Getting Started Guide - Page 1
Dell Networking C1048P Getting Started Guide Regulatory Model: C1048P - Dell C1048P Port Extender | Networking C1048P Getting Started Guide - Page 2
use of your computer. CAUTION: A CAUTION indicates either potential damage to hardware or loss of data and tells you how to avoid the problem. WARNING: A WARNING indicates a potential for property damage, personal injury, or death. Copyright © 2015 Dell Inc. All rights reserved. This product is - Dell C1048P Port Extender | Networking C1048P Getting Started Guide - Page 3
started by installing the C1048P port extender (PE) for use with a C9010 switch and connecting to a network. For more detailed information about C1048P installation and software configuration, see the documents in the following table, which are available on the Dell Networking Support website (Dell - Dell C1048P Port Extender | Networking C1048P Getting Started Guide - Page 4
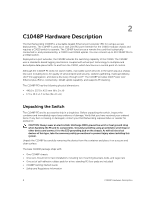
10GbE uplinks. You can connect up to 40 C1048P PEs to a C9010 switch. Deployed as a port extender, the C1048P extends the switching capability of the C9010. The C1048P uses a standards-based tagging mechanism coupled with virtual port technology to multiplex and demultiplex data-plane traffic to - Dell C1048P Port Extender | Networking C1048P Getting Started Guide - Page 5
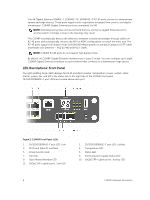
baud. The default settings are 9600 baud rate, 8 data bits, No Parity, 1 Stop Bit, and No Flow Control. 2. USB port The Type-A, female USB port supports a USB 2.0-compliant flash memory drive. The C1048P can read or write to a flash drive formatted as FAT-32. Use a USB flash drive to copy files and - Dell C1048P Port Extender | Networking C1048P Getting Started Guide - Page 6
The 48 Gigabit Ethernet (10BASE-T, 100BASE-TX, 1000BASE-T) RJ-45 ports connect to downstream servers and edge devices. These ports support auto-negotiation for speed, flow control, and duplex transmission. C1048P Gigabit Ethernet ports are numbered 1 to 48. NOTE: Dell Networking does not recommend - Dell C1048P Port Extender | Networking C1048P Getting Started Guide - Page 7
LED. A fixed stack-unit ID number from 0 to 7 displays in the right LED. If the C1048P is not connected to a C9010, the PE ID LED is blank. For more information, see Pre-provisioning a Port Extender. NOTE: The PE ID number displays as a scrolling three-digit number. Each digit displays briefly - Dell C1048P Port Extender | Networking C1048P Getting Started Guide - Page 8
PE is operating as a stack master or in standalone mode. NOTE: While the C1048P is booting up in standalone or stacking mode, the Stack Master LED is solid Link is up and operating at maximum 10G port speed. • Solid amber: Link is up and operating at lower 1G port speed. SFP+ activity status • Off: - Dell C1048P Port Extender | Networking C1048P Getting Started Guide - Page 9
on its back panel. Stack port 1 is on top; stack port 2 is on the bottom. You can stack up to eight C1048P PEs using the mini-SAS ports on the back panel. A C1048P PE supports stacking only with other C1048P PEs. When you connect multiple C1048P PEs using the stack ports, the PEs operate as a single - Dell C1048P Port Extender | Networking C1048P Getting Started Guide - Page 10
data link activity. • Flashing green: Stack link is up and transmitting/receiving data. Before You Start: Site Preparation Before installing the C1048P port extender, make sure that your installation site meets these requirements: • Clearance: There is adequate space in front of the PE so you can - Dell C1048P Port Extender | Networking C1048P Getting Started Guide - Page 11
as fans and blowers in the switch, can draw dust and other particles causing contaminant buildup inside the chassis, which can result in system malfunction. C1048P Hardware Description 11 - Dell C1048P Port Extender | Networking C1048P Getting Started Guide - Page 12
be able to support the weight of the C1048P and the PE cables. The C1048P ships with four self-adhesive rubber pads. 1. When installing the C1048P on a C1048P in a rack, review the following rack mounting safety considerations. WARNING: For complete safety information, read the safety instructions - Dell C1048P Port Extender | Networking C1048P Getting Started Guide - Page 13
port extender with the rear panel facing in the downward position. Installing a Rack Mount Tray (Optional) You can use a rack mount tray to support the weight of the C1048P in a 4-post rack. You must order the tray separately. To install a rack mount tray in a 4-post rack, follow the instructions - Dell C1048P Port Extender | Networking C1048P Getting Started Guide - Page 14
is not obstructed. 1. Align the holes on the right rack-mount bracket with the holes on the right side (facing you) of the C1048P. 2. Secure the bracket (item 3 in Figure 6) to the chassis by tightening the screws (item 2 in Figure 6) provided with the mount bracket. Figure 6. Attaching Mount - Dell C1048P Port Extender | Networking C1048P Getting Started Guide - Page 15
brackets fit the threaded holes in the rack. Figure 7. Mounting the C1048P in a 2-Post Rack Connecting to a C9010 Switch The C1048P port extender has two 10G SFP+ ports on the front panel (see Figure 2). The two SFP+ ports provide 10GbE uplinks to a C9010 switch with SFP+ transceivers. At least - Dell C1048P Port Extender | Networking C1048P Getting Started Guide - Page 16
in a C9010 switch. Stacking Multiple C1048P Port Extenders The C1048P supports PE stacking, which allows multiple C1048P units to act as a single port extender. You can stack up to eight C1048Ps using the stack ports on the back panel. C1048P stack ports support the Serial Attached SCSI (SAS - Dell C1048P Port Extender | Networking C1048P Getting Started Guide - Page 17
ring topology with the following physical connections between port extenders. The PEs are numbered Unit 0 to Unit 2. After you power on the stack units, the Stack Master LED on the C1048P that is elected master displays solid green. • The bottom mini-SAS port on the top unit is connected to the top - Dell C1048P Port Extender | Networking C1048P Getting Started Guide - Page 18
Networking MPS1000. Connect the DC power cable from the power supply to the DC receptacle on the back panel. After you connect the C1048P to a power source, the C1048P boots up. After a successful boot-up, the temperature, power, system status, and fan LEDs display solid green. The fans adjust to an - Dell C1048P Port Extender | Networking C1048P Getting Started Guide - Page 19
this way, you can "plug and play" a C1048P with a parent C9010. 1. Turn on support for port-extender configuration on a C9010. CONFIGURATION mode Dell(conf)# feature extended-bridge 2. Enter Port-Extender configuration mode to pre-provision a C1048P. CONFIGURATION mode Dell(conf)# pe provision pe-id - Dell C1048P Port Extender | Networking C1048P Getting Started Guide - Page 20
Port Extenders Information -- PE-id Status Stack-size Type System-MAC 2 online 1 C1048P 34:17:eb:00:bb:11 NOTE: If the status of a port extender auto-upgrade of the port extender to complete. If the status does not change to online, contact Dell Networking Support for assistance. Dell# - Dell C1048P Port Extender | Networking C1048P Getting Started Guide - Page 21
, you can configure L2 and other software features on the C1048P by entering CLI commands on the C9010 console. C1048P interfaces are identified in the command syntax: interface peGigE pe-id/pe-stack-unit-id/port-number where pe-id is a port-extender ID number from 0 to 255; pe-stack-unit-id is - Dell C1048P Port Extender | Networking C1048P Getting Started Guide - Page 22
loop detection and BPDU guard. No other L2 protocols are supported. IP address and L3 protocol configuration on C1048P ports are not supported. For detailed information, see the Dell Networking Configuration Guide for C9000 Series Switches. When the C1048P is online, you can enter the connect pe pe - Dell C1048P Port Extender | Networking C1048P Getting Started Guide - Page 23
tag or 11-digit express service code of your C1048P and click Submit. To view the service tag or express service code on a C1048P, pull out the tag (item 1 in Figure 10) on the upper left side of the back panel. • To receive additional kinds of technical support, click Contact Us. On the Contact - Dell C1048P Port Extender | Networking C1048P Getting Started Guide - Page 24
Figure 10. C1048P Service Tag 24 Dell Networking Support - Dell C1048P Port Extender | Networking C1048P Getting Started Guide - Page 25
Technical Specifications The following tables describe the technical specifications for the C1048P port extender. Table 3. Chassis Physical Design Parameter Specifications Height 1.7 inches (4.35 cm) Width 17.32 inches (44 cm) Depth Chassis weight 15.23 inches (38.7 cm) 15 - Dell C1048P Port Extender | Networking C1048P Getting Started Guide - Page 26
Parameter Maximum thermal output Specifications 1,017 BTU/hr @ 110V (1.738W - 1,440W PoE = 298W switch power) 26 Technical Specifications
-
 1
1 -
 2
2 -
 3
3 -
 4
4 -
 5
5 -
 6
6 -
 7
7 -
8
-
9
-
10
-
11
-
12
-
13
-
14
-
15
-
16
-
17
-
18
-
19
-
20
-
21
-
22
-
23
-
24
-
25
-
26
 |
 |

Dell Networking C1048P
Getting Started Guide
Regulatory Model: C1048P