Dell Dimension 900 Reference Guide - Page 39
Replacing the System Battery
 |
View all Dell Dimension 900 manuals
Add to My Manuals
Save this manual to your list of manuals |
Page 39 highlights
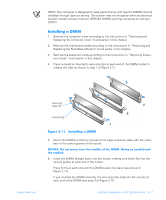
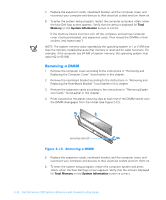
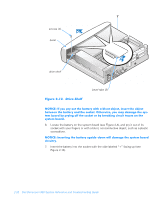
NOTE: The system memory value reported by the operating system is 1 or 2 MB less than the memory installed because that memory is reserved for video functions. For example, if the computer has 64 MB of system memory, the operating system may report 62 or 63 MB. Replacing the System Battery A 3.0-V CR2032 coin-cell battery mounted in a system board socket (see Figure 2-4) maintains system configuration, date, and time information. The battery can last several years. NOTE: Leave your power strip turned on when the computer is turned off to extend battery life. If the battery expires, the computer loses the system configuration information whenever it is disconnected from its electrical outlet. If you have to repeatedly reset this information after turning on the computer, replace the battery. To replace the system battery with another CR2032 coin-cell battery, perform the following steps. CAUTION: There is a danger of a new battery exploding if it is incorrectly installed. Replace the battery only with the same or equivalent type recommended by the manufacturer. Discard used batteries according to the manufacturer's instructions. 1. Make a copy of the screens in the system setup program. You will need a written or printed copy of the system configuration information to restore the correct settings later. See Appendix B, "System Setup Program," for instructions. 2. Remove the computer cover according to the instructions in "Removing and Replacing the Computer Cover" found earlier in this chapter. 3. Remove the riser-board bracket according to the instructions in "Removing and Replacing the Riser-Board Bracket" found earlier in this chapter. 4. Remove the front bezel by slightly lifting the three bezel tabs (see Figure 2-13), and gently pulling the bezel away from the front panel. 5. Remove the drive shelf screws, and lift the drive shelf approximately one-half inch. The drive shelf is attached to the chassis with two screws-one to the right of the optical drive and one to the left of the diskette drive as you face the front of the computer (see Figure 2-13). support.dell.com Installing Upgrades on the System Board 2-19
-
 1
1 -
2
-
3
-
4
-
5
-
6
-
7
-
8
-
9
-
10
-
11
-
12
-
13
-
14
-
15
-
16
-
17
-
18
-
19
-
20
-
21
-
22
-
23
-
24
-
25
-
26
-
27
-
28
-
29
-
30
-
31
-
32
-
33
-
 34
34 -
 35
35 -
 36
36 -
 37
37 -
 38
38 -
 39
39 -
 40
40 -
 41
41 -
 42
42 -
 43
43 -
 44
44 -
45
-
46
-
47
-
48
-
49
-
50
-
51
-
52
-
53
-
54
-
55
-
56
-
57
-
58
-
59
-
60
-
61
-
62
-
63
-
64
-
65
-
66
-
67
-
68
-
69
-
70
-
71
-
72
-
73
-
74
-
75
-
76
-
77
-
78
-
79
-
80
-
81
-
82
-
83
-
84
-
85
-
86
-
87
-
88
-
89
-
90
-
91
-
92
-
93
-
94
-
95
-
96
-
97
-
98
-
99
-
100
-
101
-
102
-
103
-
104
-
105
-
106
-
107
-
108
-
109
-
110
-
111
-
112
-
113
-
114
-
115
-
116
-
117
-
118
-
119
-
120
-
121
-
122
 |
 |