Dell Latitude CPx J System Information Guide (multilanguage: English, Czech - Page 8
computer see
 |
View all Dell Latitude CPx J manuals
Add to My Manuals
Save this manual to your list of manuals |
-
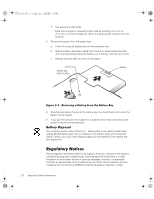
 1
1 -
2
-
 3
3 -
 4
4 -
 5
5 -
 6
6 -
 7
7 -
 8
8 -
 9
9 -
 10
10 -
 11
11 -
 12
12 -
 13
13 -
14
-
15
-
16
-
17
-
18
-
19
-
20
-
21
-
22
-
23
-
24
-
25
-
26
-
27
-
28
-
29
-
30
-
31
-
32
-
33
-
34
-
35
-
36
-
37
-
38
-
39
-
40
-
41
-
42
-
43
-
44
-
45
-
46
-
47
-
48
-
49
-
50
-
51
-
52
-
53
-
54
-
55
-
56
-
57
-
58
-
59
-
60
-
61
-
62
-
63
-
64
-
65
-
66
-
67
-
68
-
69
-
70
-
71
-
72
-
73
-
74
-
75
-
76
-
77
-
78
-
79
-
80
-
81
-
82
-
83
-
84
-
85
-
86
 |
 |

(Rev. 11/3/98)
FILE LOCATION:
J:\projects\10-01000\10-01288.del\users\joe\SIGs\Final\Emf2\Multi-
DELL CONFIDENTIAL - Preliminary
1/25/00
support.dell.com
Dell Latitude System Information
2-1
6HWXS±DQG±6DIHW\±,QIRUPDWLRQ
This chapter contains information about setting up your Dell Latitude computer,
observing safety precautions, replacing the battery, and replacing memory. It also lists
regulatory information about the system.
&RQQHFWLQJ±WKH±$&±$GDSWHU
NOTE: A partially charged battery is already installed in the computer, but Dell
recommends that you attach the AC adapter now so that the battery can complete
its charge and the operating system setup can proceed without interruption.
To connect your computer to the AC adapter, perform the following steps:
1.
Plug the AC adapter±s attached c able into the AC adapter connector on the
computer (see Figure 2-1).
)LJXUH±²³´µ±±&RQQHFWLQJ±WKH±$&±$GDSWHU
2.
Plug the AC adapter power cable into the AC adapter.
3.
Plug the AC adapter power cable into an electrical outlet.
AC adapter
AC adapter
power cable
AC adapter connector
AC adapter cable