Dell N3200-ON External Power Supply Installation PowerSwitch N2200-ON and N320
Dell N3200-ON Manual
 |
View all Dell N3200-ON manuals
Add to My Manuals
Save this manual to your list of manuals |
Dell N3200-ON manual content summary:
- Dell N3200-ON | External Power Supply Installation PowerSwitch N2200-ON and N320 - Page 1
External Power Supply Installation Dell PowerSwitch N2200-ON and N3200-ON/E3200ON Series Switches August 2023 Rev. A05 - Dell N3200-ON | External Power Supply Installation PowerSwitch N2200-ON and N320 - Page 2
data and tells you how to avoid the problem. WARNING: A WARNING indicates a potential for property damage, personal injury, or death. © 2020 - 2023 Dell Inc. or its subsidiaries. All rights reserved. Dell Technologies, Dell, and other trademarks are trademarks of Dell Inc. or its subsidiaries. Other - Dell N3200-ON | External Power Supply Installation PowerSwitch N2200-ON and N320 - Page 3
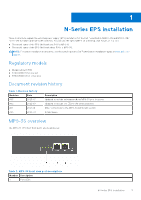
EPS installation These instructions explain the external power supply (EPS) installation for the Dell PowerSwitch N2200-ON and 3S. NOTE: For switch installation instructions, see the switch-specific Dell PowerSwitch Installation Guide at www.dell.com/ support. Regulatory models ● Model number - Dell N3200-ON | External Power Supply Installation PowerSwitch N2200-ON and N320 - Page 4
Description 2 Serial Ethernet port 3 RJ45 port 4 Serial console port NOTE: The Console and Ethernet ports are used for debugging and firmware updates by service personnel only, and are not available for use to the end user. Topics: • Desktop mount • MPS-1S two-post installation • MPS-3S two - Dell N3200-ON | External Power Supply Installation PowerSwitch N2200-ON and N320 - Page 5
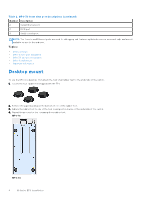
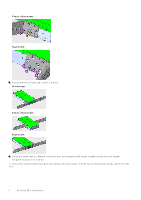
5. Turn the switch over and place on a desktop. MPS-1S two-post installation This installation procedure describes how to install an MPS-1S self in a two-post rack. Use L-brackets for front, five-inch-offset, or rear-mount two-post installation. These mounting supplies ship with the MPS-1S. 1. - Dell N3200-ON | External Power Supply Installation PowerSwitch N2200-ON and N320 - Page 6
5-inch offset mount Rear mount 3. Repeat with the second single-switch L-bracket. Front mount 5-inch offset mount Rear mount 4. Screw the single-switch L-bracket to the two-post rack using two M4 screws (length 6.8 mm) for each bracket. Torque the screws to 10 inch-lbs. To remove the switch from - Dell N3200-ON | External Power Supply Installation PowerSwitch N2200-ON and N320 - Page 7
MPS-3S two-post installation This installation procedure is for the three-slot EPS shelf. Use mounting brackets for front, 5-inch offset, or rear-mount two-post installation. These mounting supplies ship with the MPS-3S. 1. Locate the mounting brackets and screws that ship with the EPS. 2. Insert - Dell N3200-ON | External Power Supply Installation PowerSwitch N2200-ON and N320 - Page 8
from the rack, unscrew the four #12-24 rack-mounting screws. MPS-1S wall mount Use the four wall-mount brackets to attach an external power supply (EPS) to the wall. NOTE: Do not wall mount the EPS with the front panel/PSU facing up or down. You need a drill and - Dell N3200-ON | External Power Supply Installation PowerSwitch N2200-ON and N320 - Page 9
2. Screw two brackets to the left side of the EPS using the M4 screws (length 6.8 mm) for each bracket, as shown. Torque the screws to 10 in-lbs. 3. Repeat to attach two brackets to the right side of the EPS, as shown. 4. Hold the EPS or wall-mount template to the wall and mark the screw-hole - Dell N3200-ON | External Power Supply Installation PowerSwitch N2200-ON and N320 - Page 10
problem. WARNING: A WARNING indicates a potential for property damage, personal injury, or death. Installation WARNING: This equipment must be earthed. Connect the power and Ethernet ports are used for debugging and firmware updates by service personnel only, and are not available for use to the end - Dell N3200-ON | External Power Supply Installation PowerSwitch N2200-ON and N320 - Page 11
NOTE: Coat the one-hole lug with an antioxidant compound before crimping. Also, bring any unplated mating surfaces to a shiny finish and coat with an before mating. Plated mating surfaces must be clean and free from contamination. NOTE: The rack installation ears are not suitable for grounding. To
-
 1
1 -
 2
2 -
 3
3 -
 4
4 -
 5
5 -
 6
6 -
 7
7 -
8
-
9
-
10
-
11
 |
 |

External Power Supply Installation
Dell PowerSwitch N2200-ON and N3200-ON/E3200-
ON Series Switches
August 2023
Rev. A05