Dell N3200-ON External Power Supply Installation PowerSwitch N2200-ON and N320 - Page 7
MPS-3S two-post installation
 |
View all Dell N3200-ON manuals
Add to My Manuals
Save this manual to your list of manuals |
Page 7 highlights
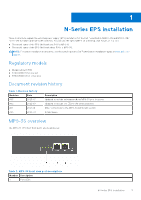
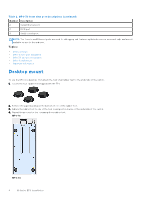
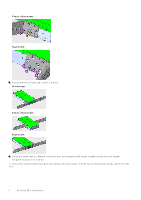
MPS-3S two-post installation This installation procedure is for the three-slot EPS shelf. Use mounting brackets for front, 5-inch offset, or rear-mount two-post installation. These mounting supplies ship with the MPS-3S. 1. Locate the mounting brackets and screws that ship with the EPS. 2. Insert the mounting brackets onto the mushroom head on each side of the EPS and slide the mounting bracket back to lock it into place. ● For front-mount: The mounting bracket and bracket ears face the front of the EPS. ● For five-inch-offset mount: The mounting bracket is at the front of the EPS with the bracket ears facing the back of the EPS. ● For rear-mount: The mounting bracket and bracket ears face the back of the EPS. 3. Attach the mounting brackets to the switch using four screws for each bracket. Torque the screws to 10 inch-lbs. Front-mount Five-inch-offset mount 4. Slide the EPS into the two-post rack until the mounting bracket ears line up with the rack. Front-mount N-Series EPS installation 7
-
 1
1 -
 2
2 -
 3
3 -
 4
4 -
 5
5 -
 6
6 -
 7
7 -
 8
8 -
 9
9 -
 10
10 -
 11
11
 |
 |
