Dell N3200-ON External Power Supply Installation PowerSwitch N2200-ON and N320 - Page 8
MPS-1S wall mount
 |
View all Dell N3200-ON manuals
Add to My Manuals
Save this manual to your list of manuals |
Page 8 highlights
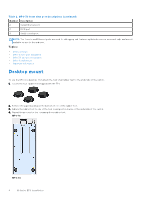
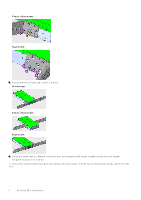
Five-inch-offset mount 5. Attach the switch to the two-post rack using two #12-24 screws on each side. To remove the switch from the rack, unscrew the four #12-24 rack-mounting screws. MPS-1S wall mount Use the four wall-mount brackets to attach an external power supply (EPS) to the wall. NOTE: Do not wall mount the EPS with the front panel/PSU facing up or down. You need a drill and a pencil to complete this procedure. This procedure applies to one EPS. 1. Remove the wall-mount brackets, wall anchors, and screws from the shipping bag. This procedure uses four wall mount anchors, four M5 screws (length 16 mm), and eight M4 screws (length 6.8 mm). 8 N-Series EPS installation
-
 1
1 -
2
-
 3
3 -
 4
4 -
 5
5 -
 6
6 -
 7
7 -
 8
8 -
 9
9 -
 10
10 -
 11
11
 |
 |

Five-inch-offset mount
5.
Attach the switch to the two-post rack using two #12-24 screws on each side.
To remove the switch from the rack, unscrew the four #12-24 rack-mounting screws.
MPS-1S wall mount
Use the four wall-mount brackets to attach an external power supply (EPS) to the wall.
NOTE:
Do not wall mount the EPS with the front panel/PSU facing up or down.
You need a drill and a pencil to complete this procedure. This procedure applies to one EPS.
1.
Remove the wall-mount brackets, wall anchors, and screws from the shipping bag.
This procedure uses four wall mount anchors, four M5 screws (length 16 mm), and eight M4 screws (length 6.8 mm).
8
N-Series EPS installation