Dell PowerEdge 2650 2-Post Rack Installation - Page 16
Installing the System in the Rack, Installing the Cable-Management Arm - weight
 |
View all Dell PowerEdge 2650 manuals
Add to My Manuals
Save this manual to your list of manuals |
Page 16 highlights
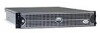
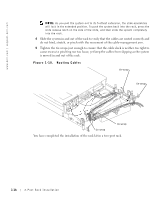
www.dell.com | support.dell.com Installing the System in the Rack CAUTION: Due to the size and weight of the system, never attempt to install the system by yourself. NOTE: The procedure for installing a system into a rack is identical for flush-mount and center-mount slide assemblies. 1 Pull the slides out to their fully extended position. CAUTION: Because of the size and weight of the system, never attempt to install the system in the slide assemblies by yourself. 2 Lift the system into position (see Figure 1-6). 3 Place one hand on the front-bottom of the system and the other hand on the backbottom of the system. 4 Tilt the back of the system down while aligning the back shoulder screws on the sides of the system with the back slots on the slide assemblies. 5 Engage the back shoulder screws into their slots. 6 Lower the front of the system, and engage the front and middle shoulder screws in their slots (the middle slot is behind the yellow system release latch) (see Figure 1-6). When all shoulder screws are properly seated, the yellow latch on each slide assembly clicks and locks the system into the slide assembly. 7 Press up on the green slide release latch at the side of each slide to slide the system completely into the rack (see Figure 1-6). 8 Push in and turn the captive thumbscrews on each side of the front chassis panel to secure the system to the rack. NOTE: Use the yellow system release latch whenever you wish to remove the system from the slide assemblies. Installing the Cable-Management Arm NOTICE: The cable-management arm can only be installed on the right side of the rack cabinet (as viewed from the back). To install the cable-management arm on the system, perform the following steps: 1 Facing the back of the rack cabinet, locate the latch on the end of the slide assembly. 2 Push the tab on the back end of the cable-management arm into the latch on the end of the slide assembly (see Figure 1-7). The latch clicks when locked. 1-12 2-Post Rack Installation
-
 1
1 -
2
-
3
-
4
-
5
-
6
-
7
-
8
-
9
-
10
-
 11
11 -
 12
12 -
 13
13 -
 14
14 -
 15
15 -
 16
16 -
 17
17 -
 18
18 -
 19
19 -
 20
20
 |
 |
