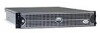
Dell PowerEdge 2650 2-Post Rack Installation - Page 8
Two-Post Rack Installation Tasks, Marking the Rack, Installing the system in the rack
 |
View all Dell PowerEdge 2650 manuals
Add to My Manuals
Save this manual to your list of manuals |
Page 8 highlights
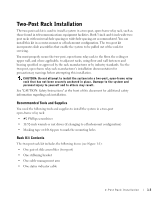
www.dell.com | support.dell.com • +Twelve 12-24 x 0.5-inch pan-head Phillips screws • Tie-wraps (not shown in Figure 1-1) Figure 1-1. Two-Post Rack Kit Components slide assemblies (2) stiffening bracket cable-management arm status indicator cable 12-24 x 0.5-inch pan-head Phillips screw (12) Two-Post Rack Installation Tasks Installing a two-post rack kit includes performing the following tasks in their numbered order: 1 Marking the rack 2 Installing the slide assemblies in the rack: • Center-mount installation • Flush-mount installation 3 Installing the system in the rack 4 Installing the cable-management arm 5 Routing cables Marking the Rack You must allow 2 U (88 mm, or 3.5 inches) of vertical space for each system you install in the two-post rack. 1-4 2-Post Rack Installation
-
 1
1 -
2
-
 3
3 -
 4
4 -
 5
5 -
 6
6 -
 7
7 -
 8
8 -
 9
9 -
 10
10 -
 11
11 -
 12
12 -
 13
13 -
14
-
15
-
16
-
17
-
18
-
19
-
20
 |
 |
