Dell PowerVault 210S Dell PowerVault 200S and 210S Storage Systems Rack I - Page 24
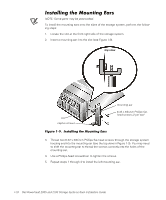
NOTE: Some parts may be preinstalled.
 |
View all Dell PowerVault 210S manuals
Add to My Manuals
Save this manual to your list of manuals |
Page 24 highlights
NOTE: Some parts may be preinstalled. To install the mounting ears onto the sides of the storage system, perform the following steps: 1. Locate the slot at the front-right side of the storage system. 2. Insert a mounting ear into the slot (see Figure 1-9). top view slot captive screws mounting ear 6-32 x 3/8-inch Phillips flathead screws (2 per ear) 3. Thread two 6-32 x 3/8-inch Phillips flat-head screws through the storage system housing and into the mounting ear (see the top view in Figure 1-9). You may need to shift the mounting ear to thread the screws correctly into the holes of the mounting ear. 4. Use a Phillips-head screwdriver to tighten the screws. 5. Repeat steps 1 through 4 to install the left mounting ear. 1-10 Dell PowerVault 200S and 210S Storage Systems Rack Installation Guide
-
 1
1 -
2
-
3
-
4
-
5
-
6
-
7
-
8
-
9
-
10
-
11
-
12
-
13
-
14
-
15
-
16
-
17
-
18
-
 19
19 -
 20
20 -
 21
21 -
 22
22 -
 23
23 -
 24
24 -
 25
25 -
 26
26
 |
 |
