Dell PowerVault 210S Dell PowerVault 200S and 210S Storage Systems Rack I - Page 25
Installation and Service Guide
 |
View all Dell PowerVault 210S manuals
Add to My Manuals
Save this manual to your list of manuals |
Page 25 highlights
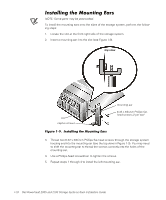
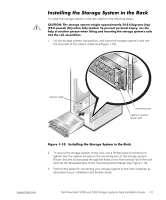
To install the storage system in the rack, perform the following steps. 1. Lift the storage system into position, and insert the storage system's rails into the channels of the interior slides (see Figure 1-10). interior slide mounting ear captive screws (2 per ear) 2. To secure the storage system to the rack, use a Phillips-head screwdriver to tighten the four captive screws on the mounting ears of the storage system. Ensure that the screws pass through the holes of the front vertical rail of the rack and into the threaded holes of the mounting-bracket flange (see Figure 1-10). 3. Perform the steps for connecting your storage system to the host computer as described in your Installation and Service Guide. support.dell.com Dell PowerVault 200S and 210S Storage Systems Rack Installation Guide 1-11
-
 1
1 -
2
-
3
-
4
-
5
-
6
-
7
-
8
-
9
-
10
-
11
-
12
-
13
-
14
-
15
-
16
-
17
-
18
-
19
-
 20
20 -
 21
21 -
 22
22 -
 23
23 -
 24
24 -
 25
25 -
 26
26
 |
 |
