Dell U2413 User Guide - Page 7
Back View, Back View with monitor stand, Label, Description - release
 |
View all Dell U2413 manuals
Add to My Manuals
Save this manual to your list of manuals |
Page 7 highlights
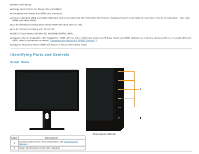
Back View Label Description 1 VESA mounting holes (100 mm x 100 mm behind attached VESA Plate) 2 Regulatory label 3 Stand release button 4 Connector label 5 Security lock slot 6 Dell Soundbar mounting brackets 7 Barcode serial number label 8 Cable management slot Back View with monitor stand Use Wall mount monitor using VESA-compatible wall mount kit (100 mm x 100 mm). List the regulatory approvals. Release stand from monitor. Indicate the connector locations. Secure monitor with security cable lock. Attach the optional Dell Soundbar. Refer to this label if you need to contact Dell for technical support. For cable management. Route cables through the slot.
-
 1
1 -
 2
2 -
 3
3 -
 4
4 -
 5
5 -
 6
6 -
 7
7 -
 8
8 -
 9
9 -
 10
10 -
 11
11 -
 12
12 -
13
-
14
-
15
-
16
-
17
-
18
-
19
-
20
-
21
-
22
-
23
-
24
-
25
-
26
-
27
-
28
-
29
-
30
-
31
-
32
-
33
-
34
-
35
-
36
-
37
-
38
-
39
-
40
-
41
-
42
-
43
-
44
-
45
-
46
-
47
-
48
-
49
-
50
-
51
-
52
-
53
-
54
-
55
-
56
-
57
-
58
-
59
-
60
-
61
-
62
-
63
-
64
-
65
-
66
-
67
-
68
-
69
-
70
-
71
 |
 |

Back View
Back View with monitor stand
Label
Description
Use
1
VESA mounting holes (100 mm x 100 mm -
behind attached VESA Plate)
Wall mount monitor using VESA-compatible wall mount kit (100 mm x 100 mm).
2
Regulatory label
List the regulatory approvals.
3
Stand release button
Release stand from monitor.
4
Connector label
Indicate the connector locations.
5
Security lock slot
Secure monitor with security cable lock.
6
Dell Soundbar mounting brackets
Attach the optional Dell Soundbar.
7
Barcode serial number label
Refer to this label if you need to contact Dell for technical support.
8
Cable management slot
For cable management. Route cables through the slot.