Dell W5300 Workgroup Laser Printer Dell™ Workgroup Laser Printer W53 - Page 177
Across an optional tray, the duplex unit, and the standard, Pull the standard tray out of the printer.
 |
View all Dell W5300 Workgroup Laser Printer manuals
Add to My Manuals
Save this manual to your list of manuals |
Page 177 highlights
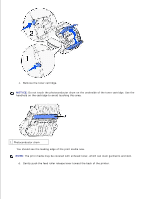
5. NOTE: With this type of jam, there may be another jam under the toner cartridge. Remove the cartridge and any jammed print media, and then reinstall the cartridge. Across an optional tray, the duplex unit, and the standard tray 1. Pull the tray out of the support unit. If only a short section of the print media is visible, do not pull down to remove the print media. 2. Slowly pull the duplex front access cover straight out from the duplex unit. 3. Pull the standard tray out of the printer.
-
 1
1 -
2
-
3
-
4
-
5
-
6
-
7
-
8
-
9
-
10
-
11
-
12
-
13
-
14
-
15
-
16
-
17
-
18
-
19
-
20
-
21
-
22
-
23
-
24
-
25
-
26
-
27
-
28
-
29
-
30
-
31
-
32
-
33
-
34
-
35
-
36
-
37
-
38
-
39
-
40
-
41
-
42
-
43
-
44
-
45
-
46
-
47
-
48
-
49
-
50
-
51
-
52
-
53
-
54
-
55
-
56
-
57
-
58
-
59
-
60
-
61
-
62
-
63
-
64
-
65
-
66
-
67
-
68
-
69
-
70
-
71
-
72
-
73
-
74
-
75
-
76
-
77
-
78
-
79
-
80
-
81
-
82
-
83
-
84
-
85
-
86
-
87
-
88
-
89
-
90
-
91
-
92
-
93
-
94
-
95
-
96
-
97
-
98
-
99
-
100
-
101
-
102
-
103
-
104
-
105
-
106
-
107
-
108
-
109
-
110
-
111
-
112
-
113
-
114
-
115
-
116
-
117
-
118
-
119
-
120
-
121
-
122
-
123
-
124
-
125
-
126
-
127
-
128
-
129
-
130
-
131
-
132
-
133
-
134
-
135
-
136
-
137
-
138
-
139
-
140
-
141
-
142
-
143
-
144
-
145
-
146
-
147
-
148
-
149
-
150
-
151
-
152
-
153
-
154
-
155
-
156
-
157
-
158
-
159
-
160
-
161
-
162
-
163
-
164
-
165
-
166
-
167
-
168
-
169
-
170
-
171
-
 172
172 -
 173
173 -
 174
174 -
 175
175 -
 176
176 -
 177
177 -
 178
178 -
 179
179 -
 180
180 -
 181
181 -
 182
182 -
183
-
184
-
185
-
186
-
187
-
188
-
189
-
190
-
191
-
192
-
193
-
194
-
195
-
196
-
197
-
198
-
199
-
200
-
201
-
202
-
203
-
204
-
205
-
206
-
207
-
208
-
209
-
210
-
211
-
212
-
213
-
214
-
215
-
216
-
217
-
218
-
219
-
220
-
221
-
222
-
223
-
224
-
225
-
226
-
227
-
228
-
229
-
230
-
231
-
232
 |
 |

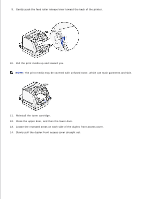
NOTE:
With this type of jam, there may be another jam under the toner cartridge. Remove the
cartridge and any jammed print media, and then reinstall the cartridge.
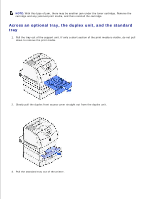
Across an optional tray, the duplex unit, and the standard
tray
Pull the tray out of the support unit. If only a short section of the print media is visible, do not pull
down to remove the print media.
1.
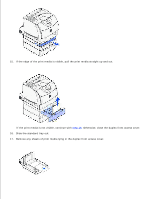
Slowly pull the duplex front access cover straight out from the duplex unit.
2.
Pull the standard tray out of the printer.
3.