Dewalt DC411B Instruction Manual - Page 19
Mounting and Using Depressed Center, Grinding Wheels and Sanding Flap Discs - wrench
 |
View all Dewalt DC411B manuals
Add to My Manuals
Save this manual to your list of manuals |
Page 19 highlights
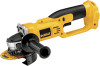
English Always lock the trigger switch when carrying or storing the tool to eliminate unintentional starting. FIG. 3 UNLOCKED B LOCKED A To unlock the trigger switch, press the lock-off button. When the lock-off button is depressed to the unlock icon, the unit is unlocked. The lock-off button is colored red to indicate when the switch is in its unlocked position. Pull the trigger switch (A) to turn the motor ON. Releasing the trigger switch turns the motor OFF. NOTE: This tool has no provision to lock the switch in the ON position, and should never be locked ON by any other means. CAUTION: Hold the side handle and body of the tool firmly to maintain control of the tool at start up and during use and until the wheel or accessory stops rotating. Make sure the wheel has come to a complete stop before laying the tool down. CAUTION: Allow the tool to reach full speed before touching tool to the work surface. Lift the tool from the work surface before turning the tool off. SPINDLE LOCK The spindle lock pin is provided to prevent the spindle from rotating when installing or removing wheels. Operate the spindle lock pin only when the tool is turned off, the battery is removed, and the wheel has come to a complete stop. CAUTION: To reduce the risk of damage to the tool, do not engage the spindle lock while the tool is operating. Damage to the tool will result and attached accessory may spin off possibly resulting in injury. To engage the lock, depress the spindle lock button and rotate the spindle until you are unable to rotate the spindle further. Mounting and Using Depressed Center Grinding Wheels and Sanding Flap Discs MOUNTING AND REMOVING HUBBED WHEELS WARNING: To reduce the risk of serious personal injury, turn tool off and and remove battery pack before making any adjustments or removing/installing attachments or accessories. Hubbed wheels install directly on the 5/8"-11 threaded spindle. 1. Thread the wheel on the spindle by hand. 2. Depress the spindle lock button and use a wrench to tighten the hub of the wheel. 3. Reverse the above procedure to remove the wheel. CAUTION: Failure to properly seat the wheel before turning the tool on may result in damage to the tool or the wheel. MOUNTING NON-HUBBED WHEELS WARNING: To reduce the risk of serious personal injury, turn tool off and and remove battery pack before making any adjustments or removing/installing attachments or accessories. 17
-
 1
1 -
2
-
3
-
4
-
5
-
6
-
7
-
8
-
9
-
10
-
11
-
12
-
13
-
 14
14 -
 15
15 -
 16
16 -
 17
17 -
 18
18 -
 19
19 -
 20
20 -
 21
21 -
 22
22 -
 23
23 -
 24
24 -
25
-
26
-
27
-
28
-
29
-
30
-
31
-
32
-
33
-
34
-
35
-
36
-
37
-
38
-
39
-
40
-
41
-
42
-
43
-
44
-
45
-
46
-
47
-
48
-
49
-
50
-
51
-
52
-
53
-
54
-
55
-
56
-
57
-
58
-
59
-
60
-
61
-
62
-
63
-
64
-
65
-
66
-
67
-
68
-
69
-
70
-
71
-
72
-
73
-
74
-
75
-
76
-
77
-
78
-
79
-
80
-
81
-
82
-
83
-
84
-
85
-
86
-
87
-
88
 |
 |
