Dewalt DXCM201 Instruction Manual - Page 21
To Replace or Clean Check Valve, Additional Service, Accessories, Service Information, Repairs
 |
View all Dewalt DXCM201 manuals
Add to My Manuals
Save this manual to your list of manuals |
Page 21 highlights
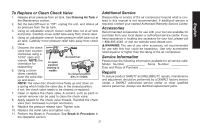
To Replace or Clean Check Valve Additional Service English 1. Release all air pressure from air tank. See Draining Air Tank in the Maintenance section. 2. Set the Auto/Off lever to "Off", unplug the unit, and relieve all air pressure from the air tank. 3. Using an adjustable wrench loosen outlet tube nut at air tank and pump. Carefully move outlet tube away from check valve. 4. Using an adjustable wrench loosen pressure relief tube nut at air tank. Carefully move pressure relief tube away from check valve. 5. Unscrew the check valve (turn counter- clockwise) using a 13/16" open end Screwdriver wrench. NOTE: the orientation for reassembly. 6. Using a screw- In open position nothing is visible. driver, carefully push the valve disc In closed position disc is visible. up and down. NOTE: The valve disc should move freely up and down on a spring which holds the valve disc in the closed position, if not, the check valve needs to be cleaned or replaced. 7. Clean or replace the check valve. A solvent, such as paint or varnish remover can be used to clean the check valve. 8. Apply sealant to the check valve threads. Reinstall the check valve (turn clockwise) to proper orientation. 9. Replace the pressure release tube. Tighten nuts. 10. Replace the outlet tube and tighten nuts. 11. Perform the Break-in Procedure. See Break-in Procedure in the Operation section. Disassembly or service of the air compressor beyond what is covered in this manual is not recommended. If additional service is required, contact your nearest Authorized Warranty Service Center. Accessories Recommended accessories for use with your tool are available for purchase from your local dealer or authorized service center. If you need assistance in locating any accessory for your tool, please call 1-888-895-4549 or visit our website www.dewalt.com. WARNING: The use of any other accessory not recommended for use with this tool could be hazardous. Use only accessories rated equal to or higher than the rating of the air compressor. Service Information Please have the following information available for all service calls: Model Number Serial Number Date and Place of Purchase Repairs To assure product SAFETY and RELIABILITY, repairs, maintenance and adjustment should be performed by a DeWALT factory service center, a DeWALT authorized service center or other qualified service personnel. Always use identical replacement parts. 21
-
 1
1 -
2
-
3
-
4
-
5
-
6
-
7
-
8
-
9
-
10
-
11
-
12
-
13
-
14
-
15
-
 16
16 -
 17
17 -
 18
18 -
 19
19 -
 20
20 -
 21
21 -
 22
22 -
 23
23 -
 24
24 -
 25
25 -
 26
26 -
27
-
28
 |
 |
