Dymo LabelManager® 220P User Guide 1
Dymo LabelManager® 220P Manual
 |
View all Dymo LabelManager® 220P manuals
Add to My Manuals
Save this manual to your list of manuals |
Dymo LabelManager® 220P manual content summary:
- Dymo LabelManager® 220P | User Guide 1 - Page 1
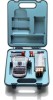
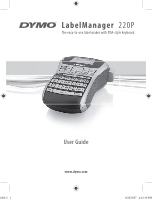
LabelManager 220P The easy-to-use label maker with PDA-style keyboard titled-2 1 User Guide www.dymo.com 8/20/2007 4:23:19 PM - Dymo LabelManager® 220P | User Guide 1 - Page 2
the Tape Cassette 6 Using the Label Maker for the First Time 7 Getting to Know the Label Maker 7 Power ...7 LCD Display 8 Format ...8 Insert ...8 Settings ...8 CAPS Mode 8 Num Lock 9 Backspace 9 Clear ...9 Navigation Keys 9 Cancel ...9 Formatting Your Label 9 Changing the Font Size - Dymo LabelManager® 220P | User Guide 1 - Page 3
13 Printing Options 13 Previewing Your Label 13 Printing Multiple Labels 14 Creating Fixed-Length Labels 14 Adjusting the Print Contrast 14 Using the Label Maker Memory 15 Saving a Label 15 Opening Saved Labels 15 Inserting Saved Text 15 Caring for Your Label Maker 16 Troubleshooting 17 - Dymo LabelManager® 220P | User Guide 1 - Page 4
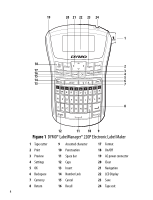
20 21 22 23 24 1 18 2 17 16 15 3 4 5 14 6 13 7 Caps 8 Accent 12 11 10 9 Figure 1 DYMO® LabelManager® 220P Electronic Label Maker 1 Tape cutter 9 Accented character 17 Format 2 Print 10 Punctuation 18 On/Off 3 Preview 11 Space bar 19 AC power connector 4 Settings 12 Caps 20 - Dymo LabelManager® 220P | User Guide 1 - Page 5
About Your New Label Maker With the DYMO® LabelManager® 220P electronic label maker, you can create a wide variety of high-quality, self-adhesive labels. You can choose to print your labels in many different font sizes and styles. The label maker uses DYMO D1 tape cassettes in widths of 1/4"(6 mm), - Dymo LabelManager® 220P | User Guide 1 - Page 6
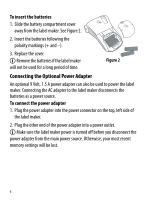
3. Replace the cover. Ç Remove the batteries if the label maker will not be used for a long period of time. Figure 2 Connecting the Optional Power Adapter An optional 9 Volt, 1.5 A power adapter can also be used to power the label maker. Connecting the AC adapter to the label maker disconnects - Dymo LabelManager® 220P | User Guide 1 - Page 7
the Tape Cassette Your label maker comes with one tape cassette. Visit www.dymo.com for information about purchasing additional tape cassettes. To insert the tape cassette 1. Lift the tape cassette cover to open the tape compartment. See Figure 3. Figure 3 Ç Before using the label maker for - Dymo LabelManager® 220P | User Guide 1 - Page 8
is available. 3. Select the width of the tape cassette currently in the label maker and press }. You are now ready to print your first label. To print a label 1. Enter text to create a simple label. 2. Press . 3. Select the number of copies. 4. Press } to print. 5. Press the cutter button to cut the - Dymo LabelManager® 220P | User Guide 1 - Page 9
of characters displayed will vary due to proportional spacing. With DYMO's exclusive graphical display, most of the formatting you add is Font Size, Clear Format, Mirror, Label Length, Alignment, Underline, Borders, and Style submenus. These formatting features are described later in this User Guide - Dymo LabelManager® 220P | User Guide 1 - Page 10
key displays the Language, Label Width and Contrast submenus. These features are described later in this User Guide. CAPS Mode The Caps gives you a choice to clear all label text, just the text formatting, or both. Navigation Keys You can review and edit your label using the left and right arrow - Dymo LabelManager® 220P | User Guide 1 - Page 11
, and Extra Extra Large. The font size applies to all characters on a label. To set the font size 1. Press . 2. Select Font Size and press }. 3. Select the desired font size and press }. The font size indicator on the display changes as you select font sizes. Adding Font Styles You can choose from - Dymo LabelManager® 220P | User Guide 1 - Page 12
. 2. Select Style and press }. 3. Select a font style and press }. Adding Borders and Underline Styles You can highlight your text by choosing a border or underline style. Underline Parchment Square Call Out Rounded Flowers Edged Crocodile Pointed A label can be underlined or enclosed in - Dymo LabelManager® 220P | User Guide 1 - Page 13
ë is inserted at the end of the line, but will not print on the label. 2. Type the text for the second line. 3. Press to print. Aligning the Text You can align the text to print left or right justified on the label. The default alignment is centered. To change the alignment 1. Press . 2. Select - Dymo LabelManager® 220P | User Guide 1 - Page 14
Using Symbols and Special Characters Symbols, punctuation, and special characters can be added to your labels. Adding Symbols The label maker supports the extended symbol set shown below. (Subscripts/Superscripts) To insert a symbol 1. Press , select Symbols, and press }. 2. Select the symbol - Dymo LabelManager® 220P | User Guide 1 - Page 15
key. To insert a currency symbol 1. Press . 2. Select the currency symbol you want and press }. Adding International Characters The label maker supports the extended Latin character set using RACE technology. After pressing the Accent key, repeatedly pressing a letter scrolls through the - Dymo LabelManager® 220P | User Guide 1 - Page 16
a line break character between the two lines. To preview your label ♦ Press . The label length is displayed, then the text of the label scrolls across the display. Printing Multiple Labels Each time you print, you are asked how many copies to print. You can print up to ten copies at one time. To - Dymo LabelManager® 220P | User Guide 1 - Page 17
to fine tune the print quality of your label. To set the contrast 1. Press . 2. Select Contrast and press }. 3. Use the arrow keys to select a contrast setting between 1 (less contrast) and 5 (more contrast), and press }. Using the Label Maker Memory The label maker has a powerful memory feature - Dymo LabelManager® 220P | User Guide 1 - Page 18
the memory locations. 3. Select a memory location and press }. Your label text is saved and you are returned to the label. Opening Saved Labels You can easily open labels saved in memory to use at a later time. To open saved labels 1. Press . A message is displayed to confirm you want to overwrite - Dymo LabelManager® 220P | User Guide 1 - Page 19
long and trouble-free service, while requiring very little maintenance. Clean your label maker from time to time to keep it working properly. Clean the cutter blade each time you replace the tape cassette. To clean the cutter blade 1. Remove the tape cassette. Press and Print head hold 2. Press - Dymo LabelManager® 220P | User Guide 1 - Page 20
Troubleshooting Review the following possible solutions if you encounter a problem while using your label maker. Problem/Error Message Solution No display • Ensure the label maker is turned on. • Replace discharged batteries. Poor Print Quality • Replace batteries or attach power adapter. • - Dymo LabelManager® 220P | User Guide 1 - Page 21
, and User Guide page number • Brief description of instructions that are inaccurate or unclear, areas where more detail is needed, and so on We also welcome your suggestions about additional topics you would like to see covered in the documentation. Send email messages to: [email protected] - Dymo LabelManager® 220P | User Guide 1 - Page 22
Environmental Information The equipment that you have bought requires the extraction and use of natural resources for its production. It may contain substances that are hazardous to health and the environment. In order to avoid the dissemination of those substances in our environment, and to - Dymo LabelManager® 220P | User Guide 1 - Page 23
23 - Dymo LabelManager® 220P | User Guide 1 - Page 24
26 M220P-UK_WEU.indd 26 931415 www.sanford.com Produced by: DYMO Stamford CT 06902 800-426-7827: www.dymo.com ©2007 A Newell Rubbermaid Company 10-07-2007 15:12:24
-
 1
1 -
 2
2 -
 3
3 -
 4
4 -
 5
5 -
 6
6 -
 7
7 -
8
-
9
-
10
-
11
-
12
-
13
-
14
-
15
-
16
-
17
-
18
-
19
-
20
-
21
-
22
-
23
-
24
 |
 |
LabelManager
220P
The easy-to-use label maker with PDA-style keyboard
www.dymo.com
User Guide
titled-2 1
titled-2
1
8/20/2007 4:23:19 PM
8/20/2007
4:23:19 PM