Dymo LabelManager® 220P User Guide 1 - Page 19
Caring for Your Label Maker
 |
View all Dymo LabelManager® 220P manuals
Add to My Manuals
Save this manual to your list of manuals |
Page 19 highlights
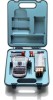
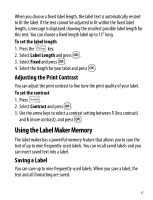
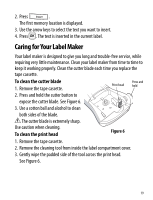
2. Press . The first memory location is displayed. 3. Use the arrow keys to select the text you want to insert. 4. Press }. The text is inserted in the current label. Caring for Your Label Maker Your label maker is designed to give you long and trouble-free service, while requiring very little maintenance. Clean your label maker from time to time to keep it working properly. Clean the cutter blade each time you replace the tape cassette. To clean the cutter blade 1. Remove the tape cassette. Press and Print head hold 2. Press and hold the cutter button to expose the cutter blade. See Figure 6. 3. Use a cotton ball and alcohol to clean both sides of the blade. è The cutter blade is extremely sharp. Use caution when cleaning. To clean the print head Figure 6 1. Remove the tape cassette. 2. Remove the cleaning tool from inside the label compartment cover. 3. Gently wipe the padded side of the tool across the print head. See Figure 6. 19
-
 1
1 -
2
-
3
-
4
-
5
-
6
-
7
-
8
-
9
-
10
-
11
-
12
-
13
-
 14
14 -
 15
15 -
 16
16 -
 17
17 -
 18
18 -
 19
19 -
 20
20 -
 21
21 -
 22
22 -
 23
23 -
 24
24
 |
 |