Dymo LabelManager® PnP User Guide 1 - Page 9
Cleaning the Label Maker, Press the cutter button. See
 |
View all Dymo LabelManager® PnP manuals
Add to My Manuals
Save this manual to your list of manuals |
Page 9 highlights
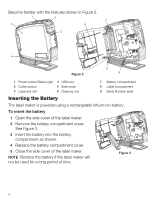
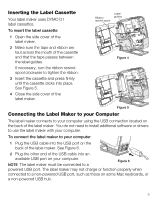
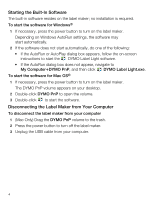
Cleaning the Label Maker Your label maker is designed to give you long and trouble-free service, while requiring very little maintenance. Clean your label maker from time to time to keep it working properly. Clean the cutter blade each time you replace the label cassette. To clean the tape print head 1 Open the side cover of the label maker. 2 Remove the label cassette. 3 Use a small, soft brush or cotton swab to wipe away paper dust and other stray particles from the inside of the label compartment. Cleaning tool Print head 4 Remove the cleaning tool from the inside of the cover. See Figure 7. 5 Gently wipe the print head with the tool. The print head is very delicate, so use care when cleaning. Figure 7 6 Replace the cleaning tool, insert the label cassette, and close the side cover. To clean the cutter blade 1 Open the side cover of the label maker. Press and hold 2 Remove the label cassette. 3 Press the cutter button. See Figure 8. The cutter blade will move into view. 4 Use a cotton swab and alcohol to clean both sides of the cutter blade. CAUTION The cutter blade is extremely sharp. Use caution when cleaning. 5 After cleaning the blade, release the cutter button to return the blade to its home position. Figure 8 7
-
 1
1 -
2
-
3
-
 4
4 -
 5
5 -
 6
6 -
 7
7 -
 8
8 -
 9
9 -
 10
10 -
 11
11 -
 12
12
 |
 |
