Electrolux EI27EW45PS Complete Owner's Guide (English) - Page 10
Control and Time Settings, Setting the User Preferences, Setting the Clock-Time of Day
 |
View all Electrolux EI27EW45PS manuals
Add to My Manuals
Save this manual to your list of manuals |
Page 10 highlights
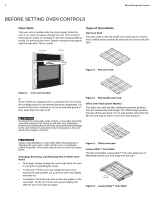
10 Setting Oven Controls Control and Time Settings Table 1: Minimum and maximum control settings Feature Fast Preheat Bake Broil Conv Bake Conv Roast Conv Broil Keep Warm Slow Cook Bread Proof Dehydrate Minimum Temp 170°F (76°C) 170°F (76°C) 300°F (148°C) 170°F (76°C) 170°F (76°C) 300°F (148°C) 150°F (66°C) Lo 225°F (108°C) 85°F (30°C) 100°F (38°C) Maximum Temp 550°F (288°C) 550°F (288°C) 550°F (288°C) 550°F (288°C) 550°F (288°C) 550°F (288°C) 190°F (86°C) Hi 275°F (134°C) 100°F (38°C) 225°F (108°C) Table 2: Minimum and maximum time setting Feature Minimum Time Maximum Time Timer Clock 12 hour Clock 24 hour Cook time 12 hour End time 12 hour End time 24 hour Clean Duration 1 min 1:00 hr 0:00 hr 1 min 1:00 hr 0:00 hr (2 hr) 11 hr 59 min 11 hr 59 min 23 hr 59 min 11 hr 59 min 12 hr 59 min 23 hr 59 min (4 hr) Setting the User Preferences The User Preferences menu includes all user defined options. This feature enables you to control the various options of the electronic controls. This menu features the Time of Day, Celsius or Fahrenheit display mode, Continuous Bake or 12 Hour Energy Saving modes, Clock display or No-Clock display, 12 Hours Time of Day or 24 Hours Time of Day, Audio Control, and Adjusting the oven temperature. The User Preferences menu is only available when the oven is not on. To browse through the User Preferences menu: 4. Press START enter to accept a new option entry or press user pref to advance to the next preference. 5. Press CANCEL off to save your entries and exit the user preferences mode. Setting the Clock-Time of Day When the appliance is powered up for the first time or when the electric supply to the appliance has been interrupted, the display will flash 12:00 (Figure 9). Before any function of the oven can be set, CANCEL off must be pressed. This will set the clock at 12:00. To set the clock for the actual time the user pref key must first be pressed to bring the oven to the clock mode. Be sure to set the correct time on the clock before using the oven, especially if cooking with added time instructions. . Figure 9: 12:00 initial display To set the clock time (example: 1:30): 1. Press user pref. CLO 1200 appears in the display. 2. Enter 1 3 0 using the numeric keypad. 130 3. Press START enter to accept the new time. 4. Press CANCEL off to exit the user preferences menu. The clock cannot be adjusted while the oven is cooking, the timer is active, or during a fresh clean cycle. If an invalid time is entered, the control sounds an error tone, a chime. Re-enter a valid time and press START enter. Pressing CANCEL off automatically sets for 12:00. 1. To bring up the User Preferences menu, press user pref. 2. Press user pref again to browse through the menu pages and select the feature you wish to adjust. 3. Press +hi or -lo to toggle through a feature's available choices, which can include the ability to increase or decrease the numeric values. You may also use the numeric keypad to input precise values.
-
 1
1 -
2
-
3
-
4
-
 5
5 -
 6
6 -
 7
7 -
 8
8 -
 9
9 -
 10
10 -
 11
11 -
 12
12 -
 13
13 -
 14
14 -
 15
15 -
16
-
17
-
18
-
19
-
20
-
21
-
22
-
23
-
24
-
25
-
26
-
27
-
28
-
29
-
30
-
31
-
32
-
33
-
34
-
35
-
36
-
37
-
38
-
39
-
40
-
41
-
42
-
43
-
44
 |
 |
