Epson 836XL User Manual - Color Calibration - Page 16
Calibrating and Evaluating the Results, If the coordinates are not within 1 point of being exact
 |
UPC - 010343820098
View all Epson 836XL manuals
Add to My Manuals
Save this manual to your list of manuals |
Page 16 highlights
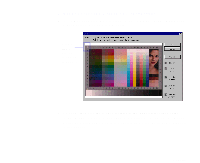
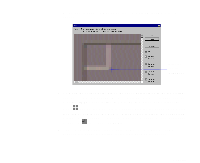
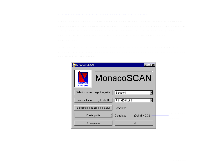
When the cross hair is positioned correctly, click the right mouse button to mark it with a green angle bracket. The resulting coordinates now look something like this: 8 If you need to correct the coordinates, scroll to the corner of the image that you need to adjust. Then right click the cross hair at the correct position to move the green angle bracket to it. If the coordinates are where you want them, click OK. If the coordinates are correct, you see the MonacoSCAN main window with Completed shown beside the Select target image crop marks button. If the coordinates are not within 1 point of being exact, you'll see an error message. Click OK and move the angle brackets as necessary. Now see Calibrating and Evaluating the Results for steps to complete your calibration. Page 16
-
 1
1 -
2
-
3
-
4
-
5
-
6
-
7
-
8
-
9
-
10
-
 11
11 -
 12
12 -
 13
13 -
 14
14 -
 15
15 -
 16
16 -
 17
17 -
 18
18 -
 19
19 -
 20
20 -
 21
21 -
22
-
23
-
24
 |
 |
