Epson ActionScanner II Mac User Manual - TWAIN Mac - Page 15
Enabling Screen Calibration, Calibrating Your Printer to Your Scanner
 |
View all Epson ActionScanner II Mac manuals
Add to My Manuals
Save this manual to your list of manuals |
Page 15 highlights
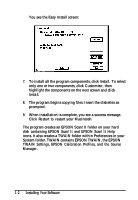
Note: If you use a different monitor or change your video resolution, calibrate your screen again. Enabling Screen Calibration Once you calibrate your screen, you need to make sure screen calibration is enabled (the default setting). Follow these steps: 1. Start EPSON Scan! II, if necessary. 2. From the File menu, choose Acquire to start EPSON TWAIN. You see the EPSON TWAIN screen. If the screen is fairly small and has an Advanced button, it is the easy screen. Click Advanced to switch to the advanced screen. If the screen is large and has a Configuration button, it is the advanced screen. 3. Click Configuration to open the Configuration dialog box. 4. Make sure the EPSON Calibration radio button is turned on. If it isn't, select it to enable screen calibration. 5. Choose OK. 6. Close the EPSON TWAIN screen. When screen calibration is enabled, TWAIN uses it as it scans images until you change this setting. Calibrating Your printer to Your Scanner If you are printing color images on a color printer, you must choose a calibration profile for each of the printers you use. Printer calibration profiles ensure that the colors in your printed images closely match those in the original. Calibrating Your System 2-3
-
 1
1 -
2
-
3
-
4
-
5
-
6
-
7
-
8
-
9
-
 10
10 -
 11
11 -
 12
12 -
 13
13 -
 14
14 -
 15
15 -
 16
16 -
 17
17 -
 18
18 -
 19
19 -
 20
20 -
21
-
22
-
23
-
24
-
25
-
26
-
27
-
28
-
29
-
30
-
31
-
32
-
33
-
34
-
35
-
36
-
37
-
38
-
39
-
40
-
41
-
42
-
43
-
44
-
45
-
46
-
47
-
48
-
49
-
50
-
51
-
52
-
53
-
54
-
55
-
56
-
57
-
58
-
59
-
60
-
61
-
62
-
63
-
64
-
65
-
66
-
67
-
68
-
69
-
70
-
71
-
72
-
73
-
74
-
75
-
76
-
77
-
78
-
79
-
80
 |
 |
