Epson BrightLink Solo Interactive Module ELPIU01 Quick Setup Guide - Page 13
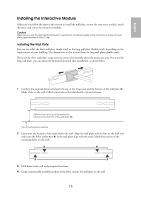
Installing the Interactive Module, Installing the Wall Plate
 |
View all Epson BrightLink Solo Interactive Module ELPIU01 manuals
Add to My Manuals
Save this manual to your list of manuals |
Page 13 highlights
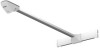
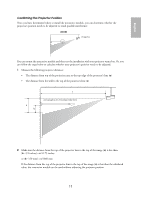
English Installing the Interactive Module Make sure you follow the steps in this section to install the wall plate, mount the interactive module, attach the cover, and center the interactive module. Caution Make sure you use the appropriate hardware to support the combined weight of the interactive module and wall plate (approximately 5.08 lb/2.3 kg). Installing the Wall Plate You can use either the short wall plate (single-stud) or the long wall plate (double-stud), depending on the requirements of your building. The illustrations in this section show the long wall plate (double-stud). If you use the short wall plate, make sure you center it horizontally above the projection area. If you use the long wall plate, you can adjust the horizontal position after installation, as shown below. 1 Confirm the required distance between the top of the image area and the bottom of the wall plate (b). Make a line on the wall at this location above the whiteboard or projection area. Distance from the top of the projection surface to the bottom of the wall plate (b) Top of the projection surface 2 Determine the location of the studs within the wall. Align the wall plate with the line on the wall and make sure the holes (either A or B) in the wall plate align with the studs. Mark the position of the mounting holes on the wall. 3 Drill holes in the wall at the required locations. 4 Using commercially available anchors or lag bolts, mount the wall plate on the wall. 13
-
 1
1 -
2
-
3
-
4
-
5
-
6
-
7
-
 8
8 -
 9
9 -
 10
10 -
 11
11 -
 12
12 -
 13
13 -
 14
14 -
 15
15 -
 16
16 -
 17
17 -
 18
18 -
19
-
20
-
21
-
22
-
23
-
24
-
25
-
26
-
27
-
28
-
29
-
30
-
31
-
32
-
33
-
34
-
35
-
36
-
37
-
38
-
39
-
40
 |
 |
