Epson BrightLink Solo Interactive Module ELPIU01 Quick Setup Guide - Page 14
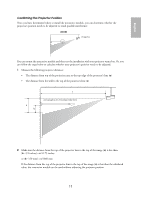
Mounting the Interactive Module, your image area.
 |
View all Epson BrightLink Solo Interactive Module ELPIU01 manuals
Add to My Manuals
Save this manual to your list of manuals |
Page 14 highlights
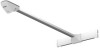
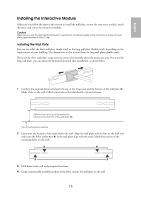
Mounting the Interactive Module Before you mount the interactive module, note the serial number on the arm. Write it down on page 18 of this guide so you can refer to it in case you need product support. 1 Attach the interactive module onto the wall plate and position the USB cable as shown. You can pass the cable through the left or right side. Make sure the cable doesn't get trapped when you mount the module on the wall plate. 2 Secure the interactive module to the wall plate with the two included bolts, using the included hexagonal wrench. Do not tighten the bolts completely until you center the interactive module over your image area. 3 If you installed the long wall plate, slide the arm horizontally to position the interactive module above the center of the projection area or whiteboard. 4 Tighten the bolts using the included hexagonal wrench. 14
-
 1
1 -
2
-
3
-
4
-
5
-
6
-
7
-
8
-
 9
9 -
 10
10 -
 11
11 -
 12
12 -
 13
13 -
 14
14 -
 15
15 -
 16
16 -
 17
17 -
 18
18 -
 19
19 -
20
-
21
-
22
-
23
-
24
-
25
-
26
-
27
-
28
-
29
-
30
-
31
-
32
-
33
-
34
-
35
-
36
-
37
-
38
-
39
-
40
 |
 |
