Epson CX5800F Product Information Guide - Page 13
Connecting the Epson Stylus CX5800F to a Phone Line, Setting Up Your Fax Features - stylus manual
 |
UPC - 010343856264
View all Epson CX5800F manuals
Add to My Manuals
Save this manual to your list of manuals |
Page 13 highlights
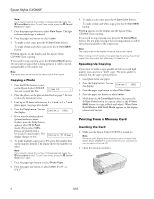
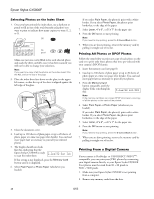
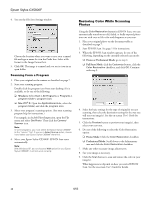
Epson Stylus CX5800F Connecting the Epson Stylus CX5800F to a Phone Line If you are connecting a phone line to the Epson Stylus CX5800F for faxing, connect the phone cable leading from the wall jack to the LINE port, as shown below. Note: If you connected the Epson Stylus CX5800F to a DSL phone line, you must install a DSL filter to the line or you won't be able to fax. Contact your DSL provider for the necessary filter. If you're also connecting the Epson Stylus CX5800F to a telephone or answering machine so you can use them to pick up voice calls on the same phone line, follow these steps: 1. Connect one end of another phone cable to the telephone or answering machine. LINE USB EXT. 2. Connect the other end of the cable to the EXT port on the back of the Epson Stylus CX5800F. 3. To receive voice calls on the phone line, you need to set up your Epson Stylus CX5800F to receive faxes manually. See page 17 for details. Setting Up Your Fax Features Before sending or receiving faxes, you may want to create a fax header, select your fax preferences, and set up a speed dial list of frequently used fax numbers. Creating Header Information 1. Press the Fax button once to enter Fax mode. The Fax button lights up and you see this display: 2. Press the Setup button. You see this display: 3. Press the u or d button, or press the 6 key on the numeric keypad, to display this option: Enter Fax Number 1.Select Speed D 6.Header & Time 4. Press the OK button. You see 1.Fax Header Set this display: 5. Press the OK button again. The display goes blank except for the cursor (_). 6. Press the keys on the numeric keypad to enter up to 40 digits of header information. Use the number keys to enter the letters A to Z (in uppercase or lowercase), the numbers 0 to 9, and various symbols. Press a key repeatedly to display first the numbers and symbols (if available), then the uppercase and lowercase letters, as indicated on the key. Wait a few seconds or press the r button to move to the next character space. When you're finished, wait a few seconds or press the r button to move to a blank space. Note: If you need to change a character to the left, press the l button to delete the character and re-enter it. Press the r button if you need to move the cursor to the right. 7. Press the OK button. You return to the 1.Fax Header Setup display. 8. Press the u or d button, or press the 2 key on the numeric keypad, to display this option: 2.Date/Time 9. Press the OK button. You see this display (to indicate the two-digit month, day, and year): MM:DD:YY 10. Press the keys on the numeric keypad to enter the date. You can enter the numbers 0 to 9. 11. Press the OK button. You see this display (to indicate the hour and minute): HH:MM AM 12. Press the keys on the numeric keypad to enter the time in a 12-hour format. You can enter the numbers 0 to 9. 13. Press the OK button. You see 1: AM 2: PM this display: 14. Press the 1 key or the 2 key on the numeric keypad to select AM (1) or PM (2). 15. Press the OK button. You return to the 2.Date/Time display. 16. If you want to print your fax number in the fax header, press the u or d button, or press the 3 key on the numeric keypad, to display this option: 3.Your Phone Num 17. Press the OK button. The display goes blank except for the cursor (_). 8/05 13
-
 1
1 -
2
-
3
-
4
-
5
-
6
-
7
-
 8
8 -
 9
9 -
 10
10 -
 11
11 -
 12
12 -
 13
13 -
 14
14 -
 15
15 -
 16
16 -
 17
17 -
 18
18 -
19
-
20
-
21
-
22
 |
 |
