Epson EPL-N1200 Product Information Guide - Page 7
USING SELECTYPE, Changing SelecType Settings, OneTouch mode setting options - toner
 |
View all Epson EPL-N1200 manuals
Add to My Manuals
Save this manual to your list of manuals |
Page 7 highlights
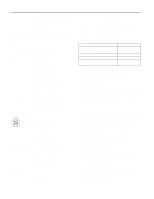
EPSON EPL-N1200 OneTouch mode setting options Setting Paper Source Options Auto MP (built-in tray) LC1 (lower cassette 1) LC2 (lower cassette 2) Page Size Manual Feed A4, A5, B5, LT, HLT, LGL, GLT, GLG, EXE, F4, MON, C10, DL, C5, C6, IB5, CTM On Off Orientation RITech Copies Portrait Landscape Dark Medium Light Off 1 to 999 MP Tray Size Toner Save A4, A5, B5, LT, HLT, LGL, GLT, GLG, EXE, F4, MON, C10, DL, C5, C6, IB5 On Off Description Selects the tray to load paper from; Auto loads from the tray containing paper that matches the Page Size setting below Selects the page size of the image to be produced Turns manual feed mode on or off for the built-in paper tray Selects the print direction on the page Sets the RITech (Resolution Improvement Technology) setting for your print job Selects the number of copies to print Selects the size of paper loaded in the built-in paper tray Sets the amount of toner used in your print job; for draft copies, set to On to use approximately 50% less toner for a lighter printout Using SelecType The SelecType button accesses a series of menus and options that are shown on the control panel display. Although you can set some of the SelecType options through your driver software, you need to use the printer's control panel to access functions like the following: t Checking the amount of toner remaining t Changing the memory buffer size t Configuring interface channels t Changing emulation modes Changing SelecType Settings You can look at your current SelecType settings by printing a status sheet. To do this, wait until the printer warms up (Ready appears on the control panel display and the On Line light is on); then press the Enter button twice. Note: Some application programs may send commands to your printer that override SelecType settings. If you do not get the results you expect from SelecType, check your application software settings to see if they affect your output. If you need to change SelecType settings, follow these steps: 1. Make sure the printer is turned on and the On Line light is on. 2. Press the Menu button on the control panel. You have now entered SelecType mode, which changes the functions of the control panel buttons as described in the table below. Button Menu Item Value Enter Alt Function Selects a new SelecType menu Selects a new menu item Changes the setting of an item Saves the new setting of an item Used with Menu, Item, and Value to scroll through selections in reverse order Used with Continue to reset the printer On Line or SelecType Exits SelecType mode 3. Press the Menu button to select the SelecType menu that includes the setting you want to change. Then press the Item and Value buttons as necessary to change the setting. 4. Press Enter to save the new setting. 5. Press On Line or SelecType to exit SelecType mode. See the next section for tables describing all the SelecType menus and settings. 1/97 EPSON EPL-N1200 - 7
-
 1
1 -
 2
2 -
 3
3 -
 4
4 -
 5
5 -
 6
6 -
 7
7 -
 8
8 -
 9
9 -
 10
10 -
 11
11 -
 12
12
 |
 |
