Epson PictureMate Pal - PM 200 Product Information Guide - Page 3
Loading Paper, Printing, Basics, User's Guide - manual
 |
View all Epson PictureMate Pal - PM 200 manuals
Add to My Manuals
Save this manual to your list of manuals |
Page 3 highlights
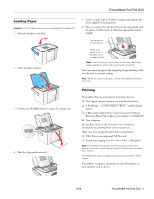
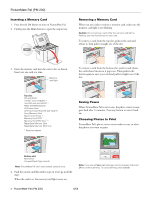
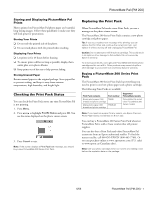
PictureMate Pal (PM 200) Loading Paper Caution: Don't load plain paper or you may damage PictureMate Pal. 1. Move the handle to the back. 2. Open the paper support. 5. Create a stack of up to 20 sheets of paper and separate the sheets slightly by fanning them. 6. Place your paper into the slot between the edge guides with the glossy or whiter side up. Slide the edge guides inward slightly. Load glossy or whiter side up Make sure paper stack is beneath arrow on edge guides Note: Load a maximum of 20 sheets at one time. Make sure paper is glossy or whiter side up to prevent smearing. Store any unused paper in the original package and keep it flat in a dry area to prevent curling. Note: When you need more paper, order a PictureMate 200 Series Print Pack. 3. Firmly press the Open button to open the output tray. 4. Slide the edge guides outward. Printing PictureMate Pal can print photos from these devices: ❏ Your digital camera's memory card (as described here) ❏ A PictBridge®- or USB-DIRECT PRINT™-enabled digital camera ❏ A Bluetooth-enabled device (requires an optional Epson Bluetooth Photo Print adapter, part number C12C824383) ❏ Your computer See the Basics book or the on-screen User's Guide for instructions on printing from connected devices. Make sure your image files meet these requirements: ❏ JPEG files or uncompressed Tiff files only ❏ Resolutions ranging from 80 × 80 to 9200 × 9200 pixels Note: PictureMate Pal supports Exif Print image enhancement features. See your camera manual to see if this feature is included on your camera. PictureMate Pal does not support progressive-scan JPEG or RAW images. PictureMate recognizes and prints the first 999 photos on your memory card or device. 6/06 PictureMate Pal (PM 200) - 3
-
 1
1 -
 2
2 -
 3
3 -
 4
4 -
 5
5 -
 6
6 -
 7
7 -
 8
8 -
 9
9 -
10
 |
 |