Epson PictureMate Pal - PM 200 Product Information Guide - Page 6
Printing Photos in Black and White or Sepia, Including the Date on Your Print, Enhancing Photos - photo printer review
 |
View all Epson PictureMate Pal - PM 200 manuals
Add to My Manuals
Save this manual to your list of manuals |
Page 6 highlights
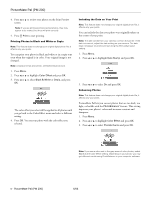
PictureMate Pal (PM 200) 4. Press or to review your photos on the Print Preview screen. Note: If you are printing portrait-oriented photos, they may appear to be rotated, but they will print correctly. 5. Press Print to start printing. Printing Photos in Black and White or Sepia Note: This feature does not change your original digital photo file; it affects only your prints. You can print your photo in black and white or in a sepia tone even when the original is in color. Your original image is not changed. Note: A sepia print has a brownish, old-fashioned photo look. 1. Press Menu. 2. Press or to highlight Color Effect and press OK. 3. Press or to select Black & White or Sepia, and press OK. The color effect you select will be applied to all photos until you go back to the Color Effect menu and select a different setting. 4. Press OK. You see your photo with the color effect you selected. Including the Date on Your Print Note: This feature does not change your original digital photo file; it affects only your prints. You can include the date your photo was originally taken on the corner of your print. Note: The date comes from your camera, not from the printer. If the date is incorrect, adjust the date setting on your camera. The date does not appear on photos printed using the Mini-wallet layout setting. 1. Press Menu. 2. Press or to highlight Date Stamp and press OK. 3. Press or to select On and press OK. Enhancing Photos Note: This feature does not change your original digital photo file; it affects only your prints. PictureMate Pal lets you correct photos that are too dark, too light, or backlit with the PhotoEnhance™ feature. This setting improves your photos' colors and increases contrast and sharpness. 1. Press Menu. 2. Press or to highlight Color Effect and press OK. 3. Press or to select PhotoEnhance and press OK. Note: If you see a color cast in the gray areas of color photos, select None as the Color Effect setting. Depending on your photo, you may get different results using PhotoEnhance in your computer software. 6 - PictureMate Pal (PM 200) 6/06
-
 1
1 -
 2
2 -
 3
3 -
 4
4 -
 5
5 -
 6
6 -
 7
7 -
 8
8 -
 9
9 -
 10
10
 |
 |
