Epson PowerLite 715c Product Information Guide - Page 5
Caution - lcd projector
 |
View all Epson PowerLite 715c manuals
Add to My Manuals
Save this manual to your list of manuals |
Page 5 highlights
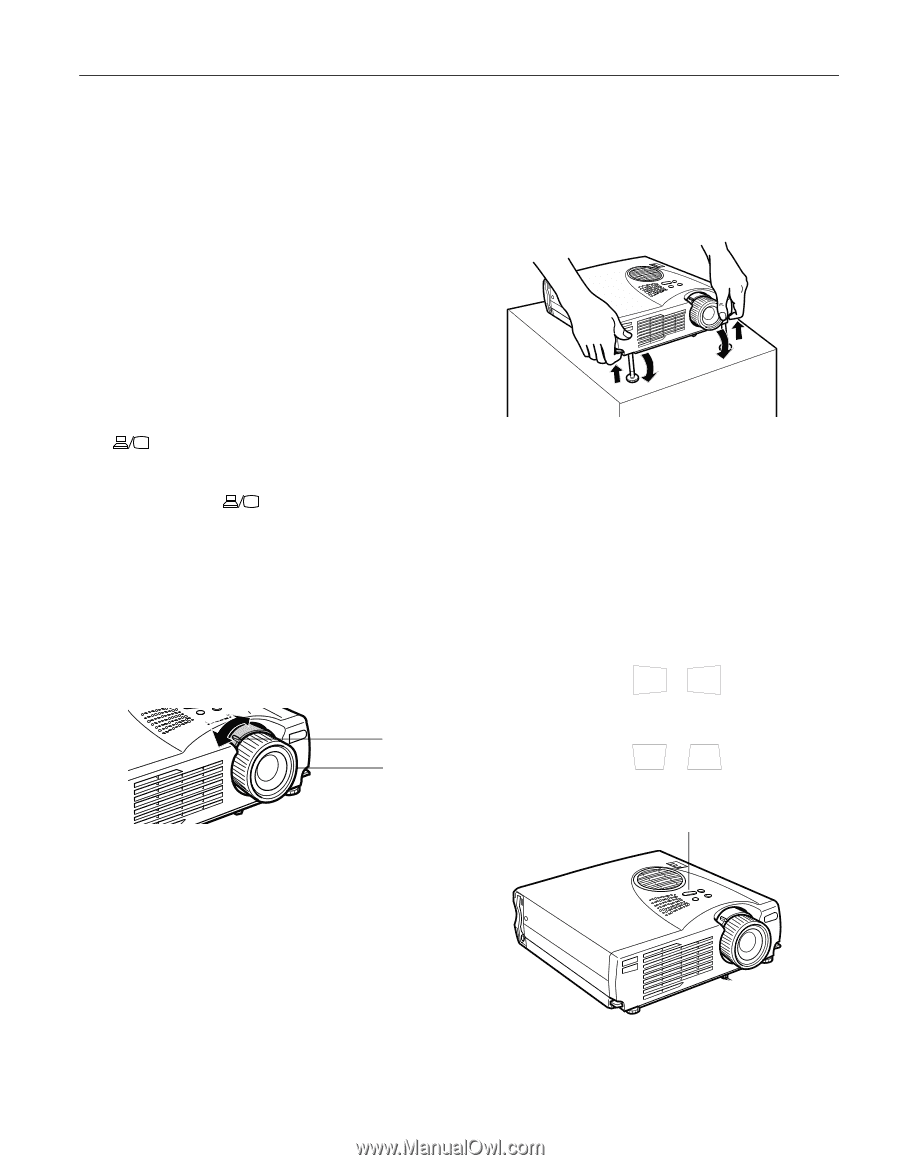
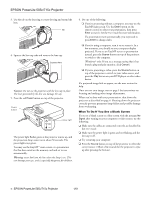
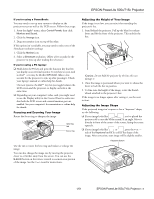
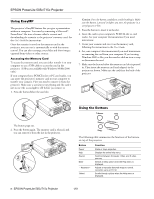
EPSON PowerLite 505c/715c Projector If you're using a PowerBook: You may need to set up your system to display on the projector screen as well as the LCD screen. Follow these steps: 1. From the Apple® menu, select Control Panels, then click Monitors and Sound. 2. Click the Arrange icon. 3. Drag one monitor icon on top of the other. If this option isn't available, you may need to select one of the Simulscan resolution settings: 1. Click the Monitor icon. 2. Select a Simulscan resolution. (Allow a few seconds for the projector to sync up after making the selection.) If you're using a PC laptop: ❏ Hold down the Fn key and press the function key that lets you display on an external monitor. It may have an icon such as or it may be labelled CRT/LCD. Allow a few seconds for the projector to sync up after pressing it. Check your laptop's manual or online help for details. On most systems, the key lets you toggle between the LCD screen and the projector, or display on both at the same time. ❏ Depending on your computer's video card, you might need to use the Display utility in the Control Panel to make sure that both the LCD screen and external monitor port are enabled. See your computer's documentation or online help for details. Focusing and Zooming Your Image Rotate the focus ring to sharpen the image. lens ring tab focus ring Use the tab to rotate the lens ring and reduce or enlarge the image. You can also change the image size by moving the projector closer to or farther away from the screen. You can use the E-Zoom button on the remote control to zoom in on a portion of the image. See the User's Guide for instructions. Adjusting the Height of Your Image If the image is too low, you can raise it by extending the projector's feet. 1. Stand behind the projector. Pull up the blue foot release levers and lift the front of the projector. This unlocks the feet. Caution: Do not hold the projector by the lens; this can damage it. 2. Once the image is positioned where you want it, release the levers to lock the feet in position. 3. To fine-tune the height of the image, rotate the thumb wheels attached to the projector's feet. If the image is no longer square after raising it, see the next section. Adjusting the Image Shape If the projected image isn't square or has a "keystone" shape, try the following: ❏ If your image looks like or , you've placed the projector off to one side of the screen, at an angle. Move it directly in front of the center of the screen, facing the screen squarely. ❏ If your image looks like or , press the + or - side of the Keystone button to correct the shape of the image. After correction, your image will be slightly smaller. Keystone button 1/01 EPSON PowerLite 505c/715c Projector - 5
-
 1
1 -
 2
2 -
 3
3 -
 4
4 -
 5
5 -
 6
6 -
 7
7 -
 8
8 -
 9
9 -
 10
10 -
 11
11 -
12
 |
 |