Epson PowerLite Pro Cinema 800 User's Guide - Page 18
Connecting the Cables
 |
View all Epson PowerLite Pro Cinema 800 manuals
Add to My Manuals
Save this manual to your list of manuals |
Page 18 highlights
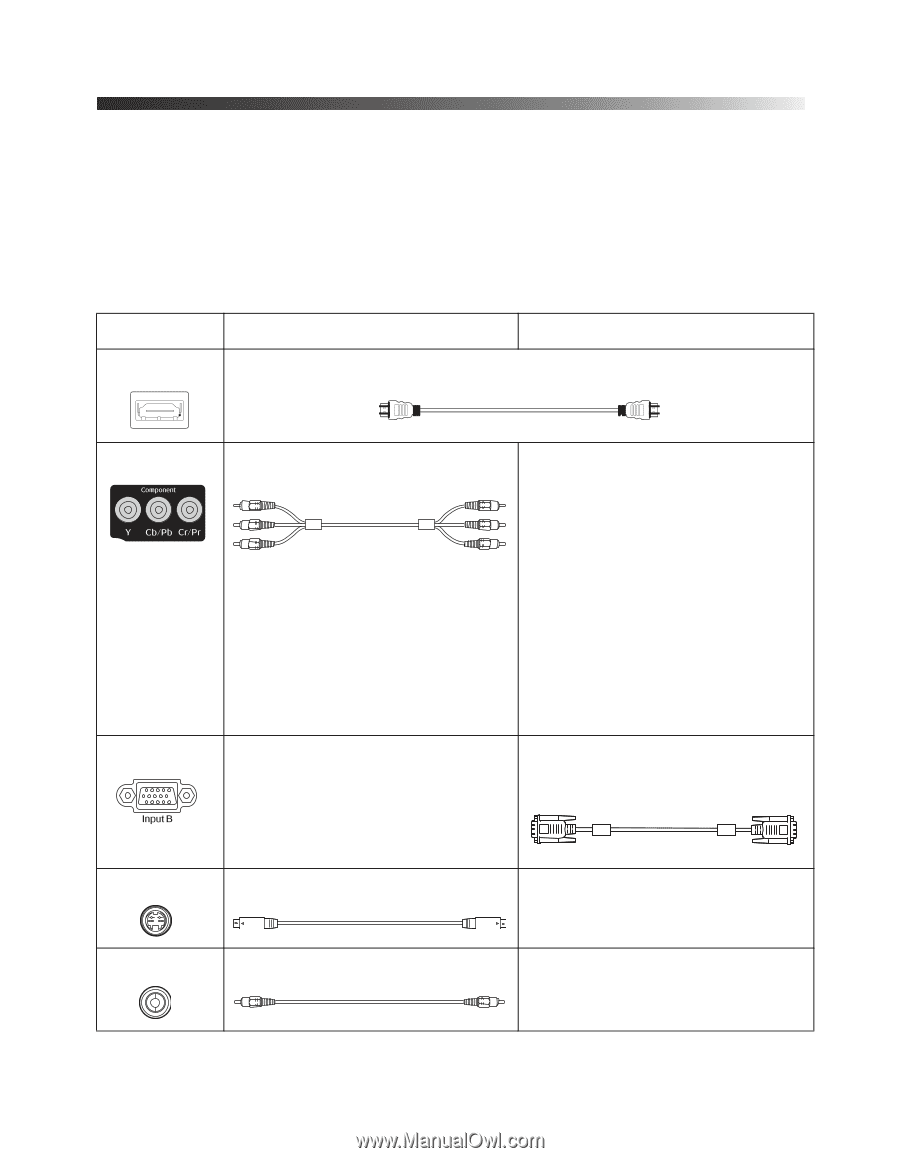
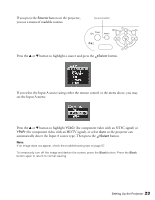
Connecting the Cables You can connect the projector to any type of video equipment, such as a VCR, DVD player, digital tuner, cable or satellite box, video game console, camcorder, or digital camera. You can also connect it to a desktop or laptop PC or Apple® Macintosh® system. You can connect up to five pieces of video equipment at the same time, using any of the commercially available cables shown below: Port name HDMI Video equipment connection* Computer connection* Use an HDMI cable: Input A Use a component video cable - (with RCA-style connectors): Component video ports Input B RGB port Connect the cable to the three component video ports. Match corresponding colors between the cable and the ports. Select YCbCr (NTSC) or YPbPr (HDTV) as the Input Signal setting (see page 22). - Use a Mini D-sub, 15-pin monitor cable to connect to a computer RGB (monitor) port S-Video Use an S-video cable: - Video Use an RCA video cable: - * For details on compatible video formats, see page 65. 18 Setting Up the Projector
-
 1
1 -
2
-
3
-
4
-
5
-
6
-
7
-
8
-
9
-
10
-
11
-
12
-
 13
13 -
 14
14 -
 15
15 -
 16
16 -
 17
17 -
 18
18 -
 19
19 -
 20
20 -
 21
21 -
 22
22 -
 23
23 -
24
-
25
-
26
-
27
-
28
-
29
-
30
-
31
-
32
-
33
-
34
-
35
-
36
-
37
-
38
-
39
-
40
-
41
-
42
-
43
-
44
-
45
-
46
-
47
-
48
-
49
-
50
-
51
-
52
-
53
-
54
-
55
-
56
-
57
-
58
-
59
-
60
-
61
-
62
-
63
-
64
-
65
-
66
-
67
-
68
-
69
-
70
-
71
-
72
-
73
-
74
-
75
-
76
-
77
-
78
-
79
-
80
 |
 |