Epson Stylus COLOR 3000 Product Information Guide - Page 10
Setting the Thickness Lever, CLEANING THE PRINT HEADS, Using the Head Cleaning Utility - a2
 |
View all Epson Stylus COLOR 3000 manuals
Add to My Manuals
Save this manual to your list of manuals |
Page 10 highlights
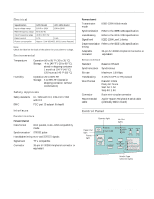
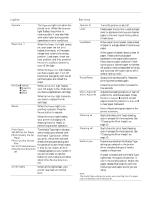
EPSON Stylus COLOR 3000 When you load media with this name . . . Load a maximum of this many sheets in the paper tray . . . Then select this Media Type setting in your printer software . . . Plain paper (single sheets) 100 letter size 30 Super A3/B size 30 A2 size Plain paper Plain paper (continuous paper) (See Chapter 3 of the User's Guide for loading instructions.) Envelopes 10 Labels (single sheets) Continuous label paper (See Chapter 3 of the User's Guide for loading instructions. EPSON 360 dpi Ink Jet Paper EPSON Special Coated Paper for 360 dpi Printing 70 letter size 30 legal size 30 Super A3/B size 30 A2 size 360 dpi Ink Jet Paper EPSON High Quality Ink Jet Paper EPSON Photo Quality Ink Jet Paper 70 letter size 30 legal size 30 Super A3/B 30 A2 size Photo Quality Ink Jet Paper EPSON Special Coated Paper for 720 dpi Printing EPSON Photo Quality Ink Jet Cards 30 cards1 EPSON 720 dpi Index Cards EPSON Photo Quality Self Adhesive Sheets EPSON Photo Quality Banner Paper (See Chapter 3 of the User's Guide for loading instructions.) EPSON Photo Quality Glossy Paper (use with support sheet) 20 letter size Photo Quality Glossy Paper EPSON Photo Quality Glossy Film (use with support sheet) 30 letter size 1 A2 size Photo Quality Glossy Film EPSON High Quality Glossy Paper (use with support sheet) 30 letter size 1 A2 size EPSON Iron-On Transfer Paper2 1 sheet EPSON Ink Jet Transparencies (use with support sheet) 30 letter size Ink Jet Transparencies EPSON Ink Jet Back Light Film 1 sheet Ink Jet Back Light Film EPSON Ink Jet Canvas Cloth (See Chapter 3 of the Ink Jet Canvas Cloth User's Guide for loading instructions.) 1 Load with the short edge leading into the feeder. 2 Turn on the Flip Horizontal option to reverse your image before you print it-especially if it includes text-so the image will appear correctly when it's transferred. Setting the Thickness Lever Be sure to check the thickness lever position if you print on thick paper such as envelopes or index cards, or if ink smears on your documents. If ink smears on your documents, set the thickness lever to the + position regardless of the paper type. To change the thickness lever position, open the printer cover and change the setting as shown below. Paper type Standard paper (single sheet) Envelopes Index cards Transparencies Labels Continuous paper Banner paper Lever position 0 + + 0 0 0 0 Cleaning the Print Heads If your printed image is unexpectedly light or faint, or dots are missing from the image, you may need to clean the print heads. This unclogs the nozzles so they can deliver ink properly. Note: You must print a few lines (for example, a nozzle check) after each print head cleaning in order to reset the cleaning cycle. Cleaning the print heads uses ink, so clean them only if print quality declines. There are two ways to clean the print heads: t The Head Cleaning utility in your printer software t The printer's control panel buttons. Use either method when the printer is connected directly to the computer. Use the control panel when you are using DOS or the printer is connected via an optional interface card. Note: If any Ink Out lights are flashing or on, you need to replace the ink cartridge instead. If you were printing when you started cleaning the print heads, the Pause light may still be on. Press the Pause button to turn off the light and resume printing. Using the Head Cleaning Utility Follow these steps to run the utility from a Windows computer or a Macintosh: 1. Make sure the printer is turned on but not printing. 2. Make sure all the Ink Out B lights are off. 3. Access the Main printer settings dialog box. 10 - EPSON Stylus COLOR 3000 5/97
-
 1
1 -
2
-
3
-
4
-
 5
5 -
 6
6 -
 7
7 -
 8
8 -
 9
9 -
 10
10 -
 11
11 -
 12
12
 |
 |
