Epson Stylus COLOR 3000 Product Information Guide - Page 7
Testing the Printer, DEFAULT CONTROL PANEL SETTINGS - print head
 |
View all Epson Stylus COLOR 3000 manuals
Add to My Manuals
Save this manual to your list of manuals |
Page 7 highlights
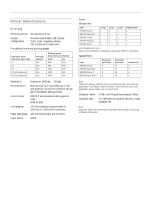
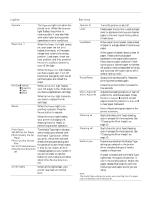
EPSON Stylus COLOR 3000 Testing the Printer You can run a printer self test to determine whether the problem lies with the printer itself or some other source. t If the test results are satisfactory, the problem lies in your computer or its printer port, software settings, or the interface cable. t If the test pages don't print correctly, you may have a problem with your printer. Follow these steps to test the printer: 1. Load several sheets of paper in the paper tray. 2. Turn off the printer. Caution: Use paper that's at least 8.3 inches (210 mm) wide. Otherwise the print head will spray ink directly onto the platen. 3. Hold down the LF/FF button and press the P Operate button to turn on the printer. Then release both buttons. This prints the test pages at 360 dpi. (If the test pages don't print, turn off the printer. Repeat the button sequence, but hold down both buttons for several seconds before releasing them.) The first page prints on the first and last lines to measure the page length. The next page contains a nozzle check pattern and multicolored character samples. To print test pages at 180 dpi, hold down the Load/Eject button while turning on the printer instead of LF/FF. The 180-dpi self test prints in black. Caution: Never turn off the printer while it is printing. To end the test, always press the Pause button, eject any loaded paper, then turn off the printer. 4. After the second page prints, press the Pause button to stop printing. 5. If the printer loaded any additional paper, press Load/Eject to eject it. Then turn off the printer to end the test. Default Control Panel Settings You can change the following "default" settings from the printer's control panel: Setting Print direction Font Pitch I/F (interface) mode Auto I/F (interface) wait time Software (emulation mode) Auto CR (IBM XL24E mode only) AGM (IBM XL24E mode only) Character table International character set for Italic table Auto line feed Network I/F (interface) mode 0 slash Page length for continuous paper Skip over perforation Auto tear off Banner mode Parallel I/F (interface) transfer rate Options Auto, Bi-D, Uni-D Courier, Roman, Sans Serif, Prestige, Script, Roman T, Sans Serif H, Draft 10, 12, 15, 17.1, or 20 cpi, or Proportional Auto, Parallel, Serial, Option 10 or 30 seconds ESC/P 2, IBM XL24E Off, On Off, On PC437 Italic USA Off, On Off, On 0, 0/ 11, 12, 8.5, or 70/6 inches or Other Off, On Off, On Off, On Fast, Normal Changing control panel settings Note: The printer's control panel buttons perform different functions while the printer is in default-setting mode. Be sure to carefully follow the instructions your printer prints and don't try to perform standard control panel functions until you've exited default-setting mode. Follow these steps to change the settings listed above: 1. Load four or more sheets of paper, at least 8.3 inches (210 mm) wide, into the paper tray, making sure the edge guides are positioned correctly and the paper-release lever is set to the singular sheet position. 2. Turn off the printer. 3. While holding down the Media Type button, turn on the printer to enter default-setting mode. Hold down both buttons for three seconds, then release them. The printer loads a sheet of paper and prints an instruction sheet telling you how to select a language (the default setting is English). 5/97 EPSON Stylus COLOR 3000 - 7
-
 1
1 -
 2
2 -
 3
3 -
 4
4 -
 5
5 -
 6
6 -
 7
7 -
 8
8 -
 9
9 -
 10
10 -
 11
11 -
 12
12
 |
 |
